Virtual private network (VPN) service with OpenVPN
Zentyal integrates OpenVPN [2] and Frr [3] to configure and manage virtual private networks. In this section you will see how to configure OpenVPN. This solution offers the following advantages:
- Authentication using public key infrastructure.
- SSL-based encryption technology.
- Clients available for Windows, Mac OS and Linux.
- Easier to install, configure and maintain than IPSec, another open source VPN alternative.
- Allows to use network applications transparently.
| [2] | OpenVPN: https://openvpn.net/ |
| [3] | Frr: https://frrouting.org/ |
Configuration of an OpenVPN server with Zentyal
Zentyal can be configured to support remote clients (sometimes known as road warriors). This means a Zentyal server acting as a gateway and VPN server with multiple local area networks (LAN) behind it, allowing external clients (the road warriors) to connect to the local network via the VPN service.
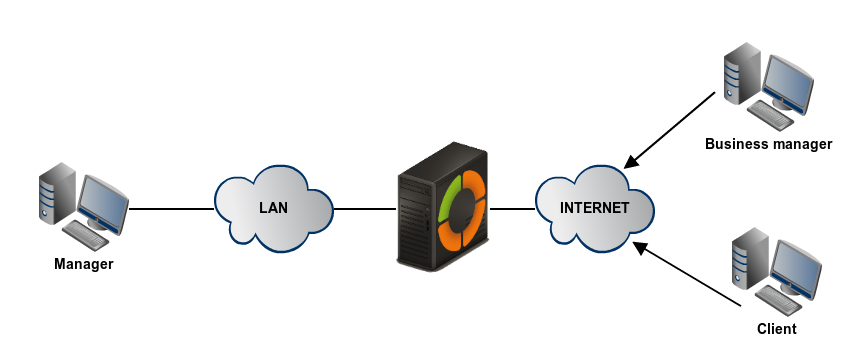
Zentyal and remote VPN clients
Your goal is to connect the data server with other two remote clients (Business manager and Client) and also the remote clients to each other.
First, you need to create a Certification Authority and individual certificates for the two remote clients. You can do this at . Note that you also need a certificate for the VPN server. However, Zentyal will issue this certificate automatically when the new VPN server is created. In this scenario, Zentyal acts as a Certification Authority.

List of issued certificates
Once you have the certificates, then configure the Zentyal VPN server by selecting Create a new server. The only value you need to enter to create a new server, is the name. Zentyal ensures that the task of creating a VPN server is easy and it sets the configuration values automatically.

Newly created VPN server
The following configuration parameters are added automatically and can be edited if necessary: Port/Protocol, Certificate (Zentyal will create one automatically using the VPN server name) and Network address. The VPN network addresses are assigned both to the server and the clients. If you need to change the Network address, you must make sure that there is no conflict with a local network. In addition, you will automatically be notified of local networks, i.e. the networks connected directly to the network interfaces of the host, through the private network.
As you can see, the VPN server will be listening on all external interfaces. Therefore, you must set at least one of your interfaces as external at . In this scenario only two interfaces are required, one internal for LAN and one external for Internet.
If you want the VPN clients to be able to connect between themselves by using their VPN addresses, you must enable the option Allow client-to-client connections.
In most of the cases, you can leave the rest of the configuration options with their default values.


VPN server configuration
In case more advanced configuration is necessary:
- VPN address:
- Indicates the virtual subnet where the VPN server and its clients will be located. You must take care that this network does not overlap with any other and for the purposes of firewall, it is an internal network. By default 192.168.160.1/24, the clients will get addresses .2,*.3*, etc.
- Server certificate:
- Certificate that will show the server to its clients. The Zentyal CA issues a certificate for the server by default, with the name vpn-<yourvpnname>. Unless you want to import an external certificate, usually you maintain this configuration.
- Client authorization by common name:
- Requires that the Common name of the client certificate will start with the selected string of characters to authorize the connection.
- TUN interface:
- By default a TAP type interface is used, more similar to a Bridge of Layer 2. You can also use a TUN type interface, more similar to a IP node of Layer 3.
- Network Address Translation (NAT):
- It is recommended to enable this translation if the Zentyal server that accepts the VPN connections is not the default gateway of the internal networks to which you can access from the VPN. Like this, the clients of these internal networks will use the Zentyal VPN as gateway, instead of their default gateway. If Zentyal server is both the VPN server and the gateway (most common case), this option is indifferent.
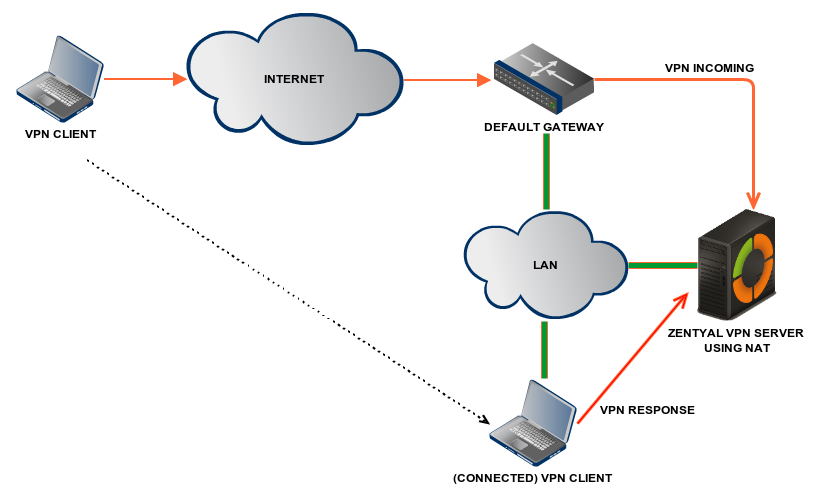
VPN server using NAT to become the default gateway for the VPN connection
- Redirect gateway:
- If this option is not checked, the external client will access through the VPN to the advertised networks, but will use the local connection to access to Internet and/or rest of the reachable networks. By checking this option, you can achieve that all the traffic of the client will go through the VPN.
The VPN can also indicate name servers, search domain and WINS servers to overwrite those of the client. This is specially useful in the case you have redirected the gateway.
After having created the VPN server, you must enable the service and save the changes. Later you must check in the that the VPN server is running.

Widget of the VPN server
After this, you must advertise networks, i.e. routes between the VPN networks and between other networks known by your server. These networks will be accessible by authorised VPN clients. To do this, you have to enable the objects you have defined (see High-level Zentyal abstractions), in the most common case, all the internal networks. You can configure the advertised networks for this VPN server through the interface of .

Advertised networks of your VPN server
Once you have done this, it is time to configure the clients. The easiest way to configure a VPN client is by using the Zentyal bundles. These are installation packages that include the VPN configuration file specific to each user and optionally, an installation program. The bundles are available in the table at , by clicking the Download button in the Download client bundle section. You can create bundles for Windows, Mac OS and Linux clients. When you create a bundle, select those certificates that will be used by the clients and set the external IP addresses to which the VPN clients must connect.
As you can see the image below, you can have one main VPN server and up to two secondary servers. Depending on the defined Connection strategy, the connection can be established in a specific order or in random order.
In addition, if the selected system is Windows, you can also add an OpenVPN™ installer. The Zentyal administrator will download the configuration bundles to the clients using the most appropriate method.

Download client bundle
A bundle includes the configuration file and the files needed to start a VPN connection, as well as optionally, the .msi file to install OpenVPN on Windows.
If, for example, we download the bundle corresponding to zentyal.zentyal-domain.lan, we can see that it contains the following files:
- 7935D4B69F4ACFC1.pem -> Certificate of the client, used to authenticate against the server and encrypt communication between the VPN client and the server.
- zentyal.zentyal-domain.lan.pem -> Private key of the client certificate.
- cacert.pm -> Certificate of the Certification Authority (CA), used to verify that the server certificate is legitimate.
- vpnserver-client.ovpn -> OpenVPN configuration file for the client.
- OpenVPN-2.6.8-I001-amd64.msi -> OpenVPN client installation file.
You now have access to the data server from both remote clients. If you want to use the local Zentyal DNS service through the private network, you need to configure these clients to use Zentyal as a name server. Otherwise, it will not be possible to access services offered by the hosts in the LAN by name, but only by IP address. Also, to browse shared files from the VPN [4], you must explicitly allow the broadcast of traffic from the Samba server.
You can see the users currently connected to the VPN service in the Zentyal Dashboard. You need to add this widget from Configure widgets, located in the upper part of the Dashboard.

Widget with connected clients
| [4] | For additional information about file sharing, go to section Domain Controller and Directory Services. |
Configuration of a VPN server for interconnecting networks
In this scenario, two offices in different networks need to be connected via private network. To do this, you will use Zentyal as a gateway in both networks. One will act as a VPN client and the other as a server. The following image clarifies the scenario:
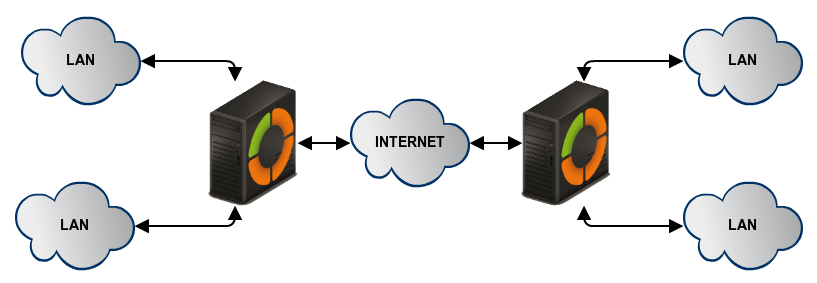
Office interconnection with Zentyal through VPN tunnel
The goal is to connect multiple offices, their Zentyal servers and their internal networks, creating one single network infrastructure in a secure way through the Internet. To do this, you need to configure a VPN server similarly as explained previously.
However, you need to make two small changes. First, enable the Allow Zentyal-to-Zentyal tunnels to exchange routes between Zentyal servers and then, introduce a Password for Zentyal-to-Zentyal tunnels to establish the connection between the two offices in a safer environment. Take into account that you need to advertise the LAN networks in Advertised Networks.
Another important difference is the routing information exchange. In the Roadwarrior to server scenario described previously, the server pushes network routes to the client. In the Server to server scenario, routes are exchanged in both directions and propagated to other clients using the RIP [5] protocol. Therefore, in the servers that act as VPN clients of the central node, it is also possible to add the Advertised Networks that will be propagated to the other nodes.

Zentyal as VPN a client
You can configure Zentyal as a VPN client at . You must give a Name to the client and enable the Service. You can configure the client manually or automatically by using the Bundle provided by the VPN server. If you do not use the Bundle, you must introduce the IP address and Protocol-port for the server accepting requests. The Tunnel password and Certificates used by the client will also be required. These certificates must have been created by the same certification authority that the server uses.

Automatic client configuration using VPN bundle
Files included in the bundle to configure the OpenVPN client:
cert.crt -> Certificate of the client, used to authenticate against the server and encrypt communication between the VPN client and the server.
privateKey.crt -> Private key of the client certificate.
ca.crt -> Certificate of the Certification Authority (CA), used to verify that the server certificate is legitimate.
server-conf.csv -> Configuration file in .csv format, which contains the OpenVPN client configuration.
The format of the csv configuration file is
proto,<tcp|udp>,ifaceType,<tap|tun>,ripPasswd,<password>,server,<IP and VPN server port>
An example:
proto,udp,ifaceType,tap,ripPasswd,VpnPassword2024,servers,192.168.80.20:1195:
When you Save changes in the , you can see a new OpenVPN™ daemon running as a client and the target connection directed towards another Zentyal server configured as a server.

Dashboard of a Zentyal server configured as a VPN client
Warning
The propagation of routes can take a few minutes.
| [5] | Routing Information Protocol (RIP): http://www.ietf.org/rfc/rfc1058 |