Domain Controller and Directory Services
Zentyal integrates Samba4 [3] as a Directory Service, implementing Windows® domain controller functionality and also file sharing.
A Domain, in this context, consists of several distributed services along all controllers, where the LDAP directory, DNS server and distributed authentication through Kerberos [4], are the most important.
The Domain concept in Zentyal is strongly related to the Microsoft Active Directory® implementation. In other words, there are servers replicating directory information and clients joined to the domain, applying the policies assigned to their Organizational Unit (OU).
| [3] | Samba: https://wiki.samba.org/index.php/Main_Page |
| [4] | Kerberos: https://en.wikipedia.org/wiki/Kerberos_(protocol) |
Configuring a Domain Server with Zentyal
LDAP configuration options
This section describes the functionality and information available in the Zentyal LDAP directory using any of the domain operation modes. The next sections will describe how to configure and make use of the features of these modes.
From the menu, you can check the operation mode of your LDAP server before enabling the module. If you have already enabled the Domain Controller and File Sharing module, your server will operate as a Stand-alone server by default.
Once you have enabled the module, you can go to Users and Computers –> LDAP settings. Here, in the upper block, you can see the LDAP information.

LDAP configuration in Zentyal
- Base DN:
- Base name of the domain name in this server. It matches the local domain. Your local domain is configured from . It will appear as blocked (you can not delete it) in your DNS module.
- Default Users DN:
- Name of the default User container.
- Default Groups DN:
- Name of the default Groups container.
Below, you can configure certain :
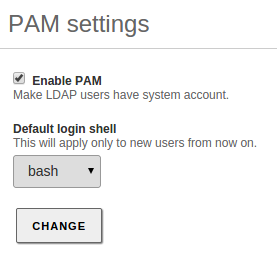
PAM configuration in Zentyal
By enabling PAM (Pluggable Authentication Modules) [10], you allow the users configured in the directory to be valid users in the local server as well. This way you can, for example, create a user in the directory capable of accessing the Zentyal server via SSH using their LDAP credentials.
| [10] | PAM: https://en.wikipedia.org/wiki/Pluggable_authentication_module |
Managing Users, Groups and Computers
By going to , you can see the LDAP tree. From this interface, you can also create and delete nodes, manage the node attributes and adjust the user permissions for other LDAP-connected services.
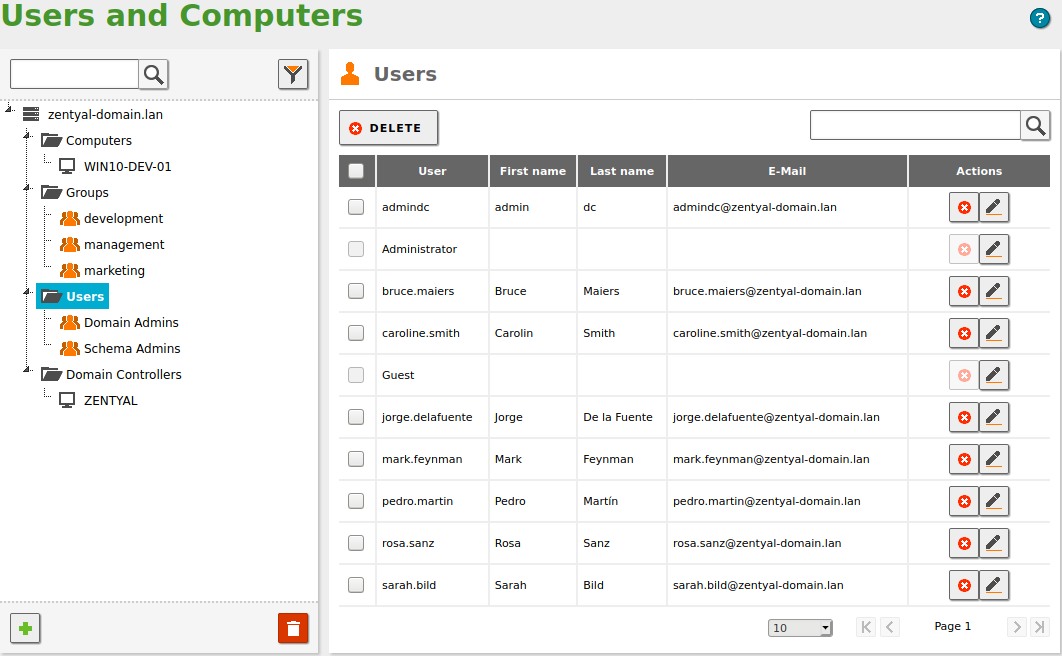
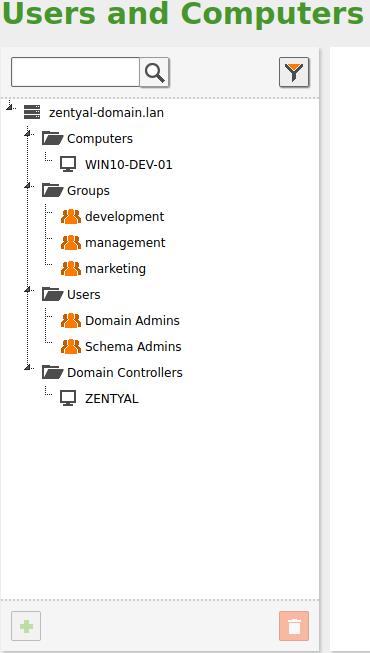
LDAP tree
On the left side you can see the tree, with your “local” domain name as the root. There are several default Organizational Units that have been created already:
- Computers: Hosts joined to the domain, both servers and desktops. This section is useful for inventory reasons and also to apply host-based rules.
- Groups: Generic container node for the groups in your organization.
- Users: Generic container node for the users in your organization.
- Domain Controllers: Servers that replicate the directory information. They can also take different FSMO roles of a Samba4/Microsoft Active Directory® domain.
An Organizational Unit (OU) is a container for other objects, like groups, users or even other nested OUs. It’s a concept closely related to the tree data structure and the different policies associated with each node. If you are not using Samba4/Microsoft Active Directory® capabilities, you probably don’t need to create new Organizational Units in your domain.
You can delete any node using the Trash icon. Also, you can create a new one by clicking on a container and then on the green Plus icon.
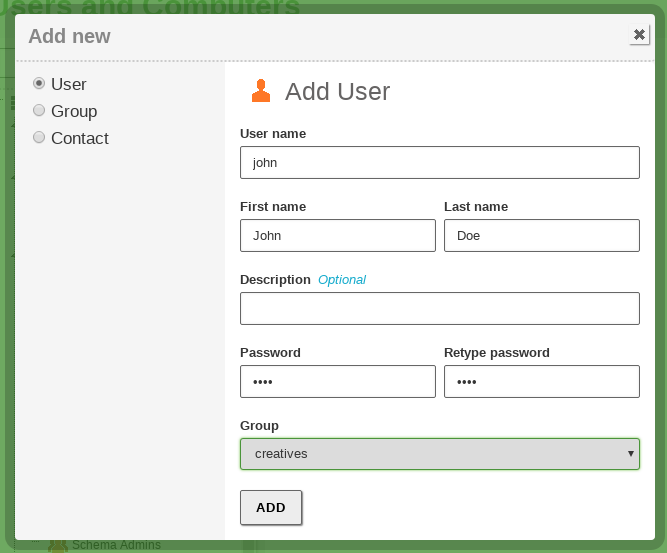
Adding a new user
It’s important to note that each time you create a user in the LDAP tree, a corresponding directory in /home/<username> is created in the file system of the server. If the directory already exists, you may have problems while creating the user. If this is the case, move or remove the pre-existing directory before creating the new user.
The Contacts are personal information objects, not related with the authorization mechanism. In other words, contacts will not be able to login in to the domain services.
On the right side you can see and modify the LDAP attributes of the currently selected node, for example, the last name of an user. If you are using a Commercial Zentyal Edition, you can also upload a user profile picture from here.
Clicking on a user, you can also modify user’s membership to the different groups and configure the user plugins. At the bottom of the right section, you will see the Modules Configuration section. This section has a variable number of subsections, depending on the installed and enabled Zentyal modules. Using this interface, you can modify the different parameters of the chosen module for the selected user. The default configuration of the user plugins depends on the User Template, explained in the next section.
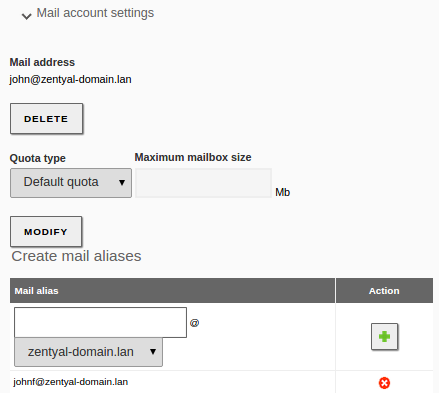
User plugin of the mail module
By selecting a group, you can also modify the users belonging to the group, create mail distribution lists and change the type of the group. The groups of type Security Group (by default), contain the users that will be able to login on the other domain services. The Distribution Group contains users that will be used for other purposes like mailing lists. A user can belong to several groups.
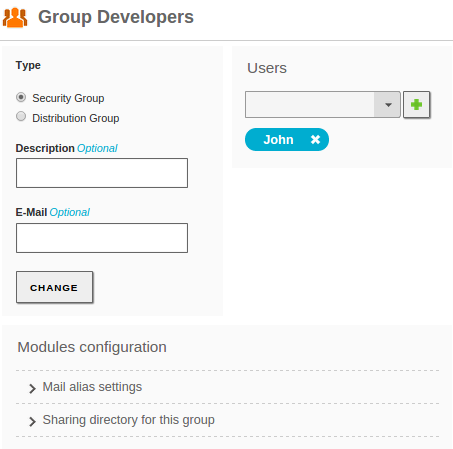
Editing a group
User Template
By going to Users and Computers –> User Template, you can modify the default service settings for the new users. For example, the default domain for their mail accounts. It’s important to note that any modifications in the template will only be applied to the users created after the change has been made. The number of sections varies depending on the user-related Zentyal modules enabled on your system.
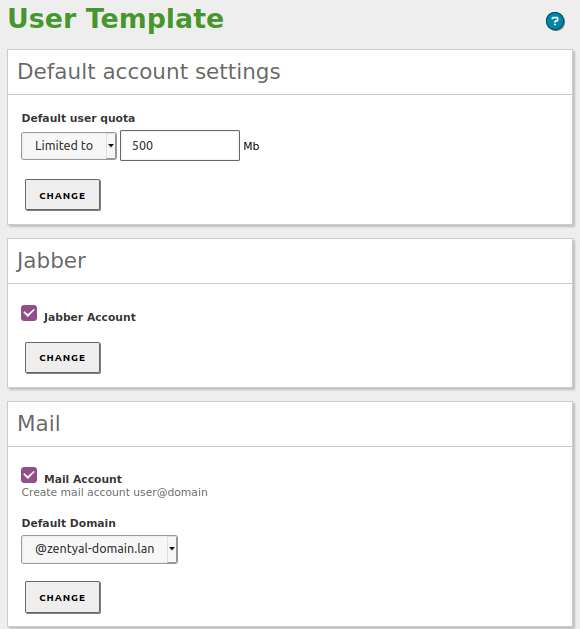
User template
Configuring Zentyal as a Standalone Domain server
Before enabling the Domain Controller and File Sharing module, you need to check certain server configurations. The reason is that during the activation of the module, the new domain is provisioned. This means that the default settings for LDAP, DNS and Kerberos are generated and the LDAP objects, Kerberos security principals, DNS zones and so on, are created. This operation can be reverted, but it’s certainly more difficult than enabling and disabling other modules.
Therefore, before enabling the “Domain Controller and File Sharing” module for the first time make sure that:
- You have configured the operation mode. The default value is Domain Controller, but you can also configure your server to be an additional controller joined to another node. In the latter case, configure the server role and credentials before enabling the module and follow the instructions for this case in the following sections. If the server is going to operate as the first Domain Controller, it is not necessary to modify the default settings.
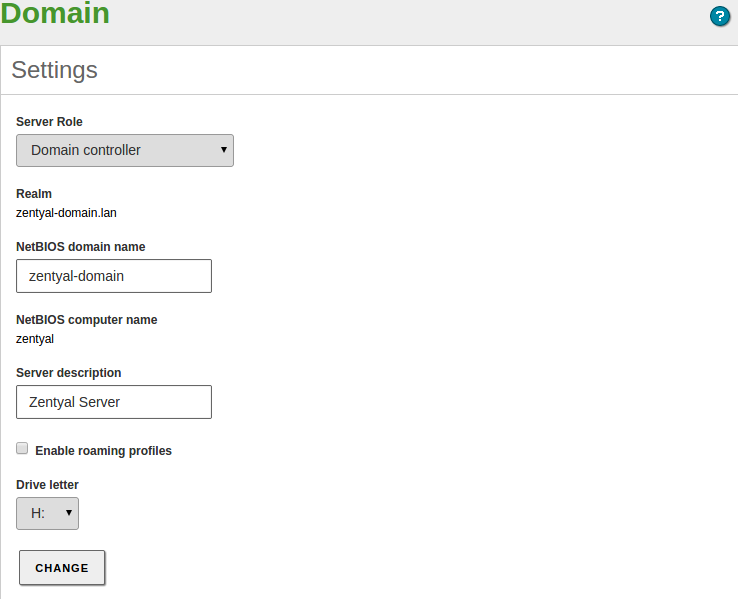
Configuring Zentyal as the Standalone Domain Controller
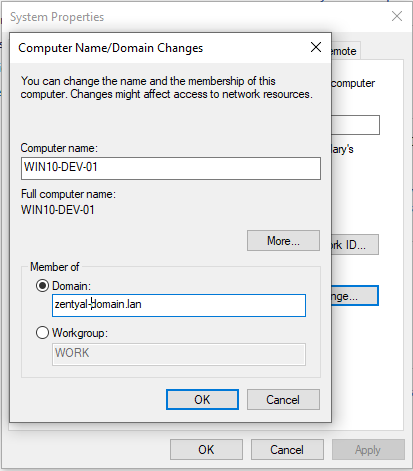
- Your local domain and host name parameters are correct. You can check this from , Hostname and Domain section. If you want to change this data, save changes and reboot the machine before enabling the module.
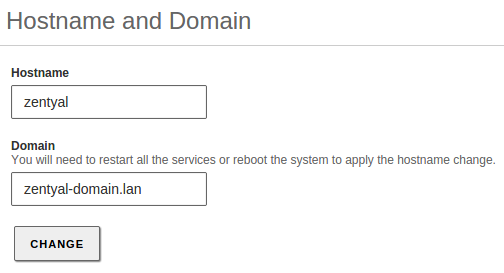
Checking the host name and domain
- In the DNS module configuration, you have a “local” domain that matches the one you have configured in . This domain has to contain the server Hostname as an A register, in the Hostnames section. This hostname has to have, at least, one local IP address. You have to add all the internal IP addresses where you want to provide domain services to this Hostname.
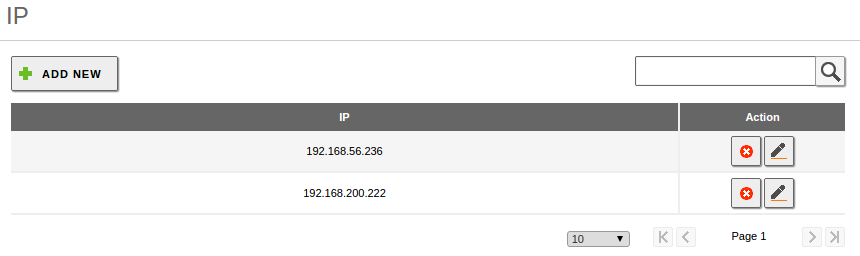
IP addresses of the zentyal-domain.lan domain
- The NTP module is installed and enabled and your clients are receiving the NTP information, preferably via DHCP.
Once you have enabled the Domain Controller and File Sharing, you can offer File Sharing functionality, join Windows® clients to the domain, configure and link GPOs (Group Policy Objects) and accept connections from new additional domain controllers, from both Windows Server® and Zentyal.
Probably one of the first operations you need to perform in your domain is to create a user in the directory and join it to the Domain Admins group. By doing this, the user will have all the effective permissions over the domain.
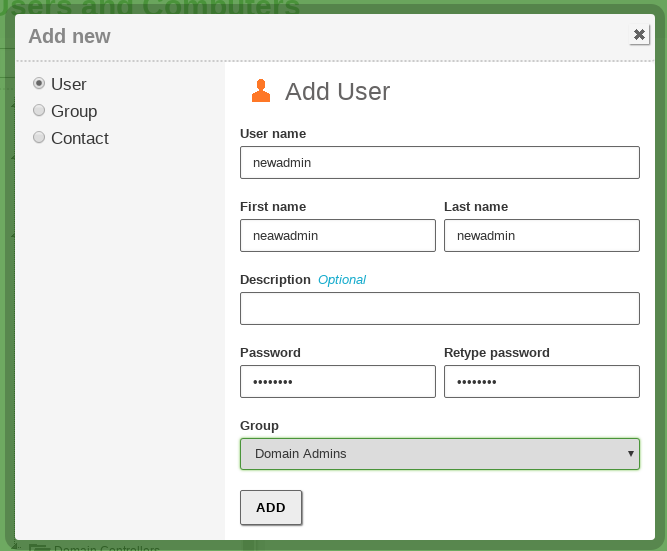
Adding a user to the Domain Admins group
Joining a Windows® client to the domain
The process of joining a Windows® client to a domain managed by Zentyal is identical to the process of joining a Windows client to a domain managed by Windows Server®.
First of all, you need to use the Domain Admin user account with administrator privileges created earlier.
Then log in to the Windows client and confirm the following:
- Zentyal server and the Windows client can reach each other through a local network
- Windows client has Zentyal configured as its DNS server
- Both the client and the server have the time perfectly synchronized using NTP
Once you have verified these preconditions, you can join to the domain in the usual way.
Joining to a domain with Windows
Use the Domain Admin-user credentials that you created earlier.
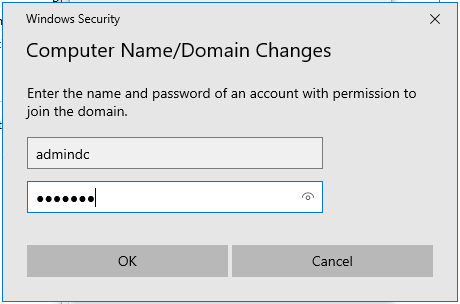
Domain Admin credentials
After the process is complete, your Windows host will appear in the LDAP tree, under the Computers OU. The user will be applied the configured GPOs and the user will obtain Kerberos tickets automatically upon login (see the Kerberos section below).
Windows host in the LDAP tree
Now you can start a session on your Windows client with the users created in the LDAP of Zentyal.
Roaming profiles and folder redirection
Zentyal offers the possibility to enable the roaming profiles for the Microsoft Windows clients.
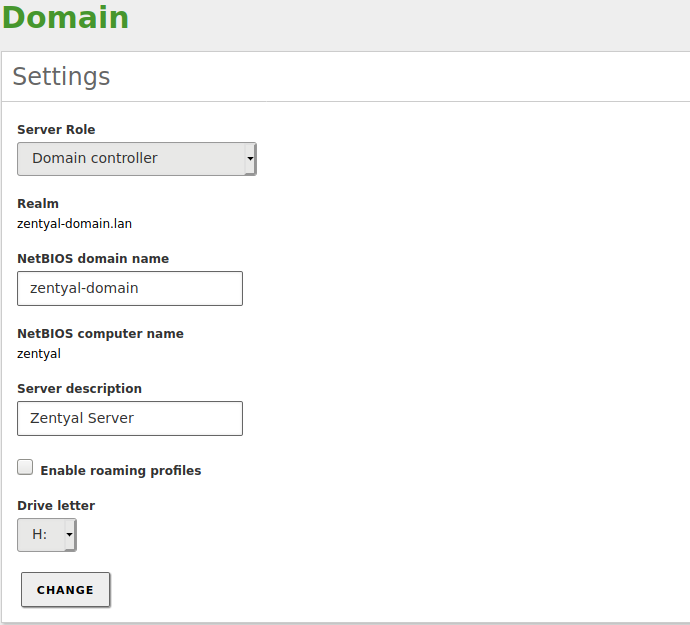
Checkbox to enable roaming profiles
When the roaming profiles are enabled, the data and configurations of the users are stored in the server in addition to the local profile. When the user authenticates on any of the domain client machines, the profile stored on the server is loaded locally and when the user logs out, the remote profile is synchronized with the local profile.
The need to synchronize the local and the remote profiles when logging in and logging out increases significantly the time required to perform both operations. This problem can be mitigated with the “folder redirection” that allows the client to mount the remote resource locally.
The folder redirection configuration process is described in detail in the Samba documentation, in the Using a Group Policy Preference [11] section.
| [11] | Folder redirection: https://wiki.samba.org/index.php/Configuring_Windows_Profile_Folder_Redirections |
Kerberos Authentication System
Kerberos is an automatic authentication service that integrates with Samba4/Microsoft Active Directory® and all the compatible services across your domain.
The client needs to provide his credentials only once to obtain the “main” ticket, Ticket Granting Ticket.
This operation is done automatically with Windows clients joined to the domain. Login credentials are sent to the Domain Controller (any of them) and the user is verfied. If the LDAP user is correct, the controller automatically provides the TGT along with other necessary tickets to allow file sharing to the client.
You can check the list of active tickets on the client using the ‘klist’ command.
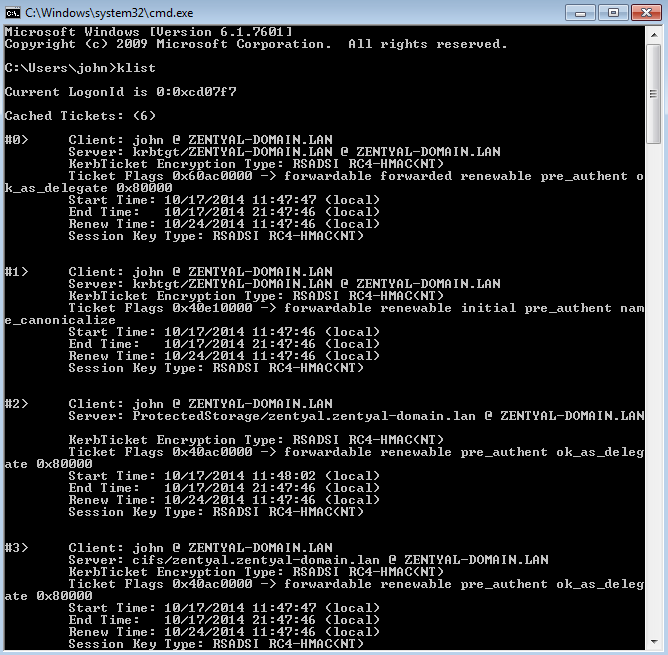
Kerberos tickets after domain login
In Debian/Ubuntu systems it is also possible to obtain the Kerberos TGT ticket by installing the heimdal-clients package.

Obtaining Kerberos TGT in Ubuntu
Once the client has obtained the Kerberos TGT ticket, all the other Kerberos-compatible services in your domain will accept tickets provided by the client. These are obtained automatically, when the user requests access to a service.
This authentication mechanism has two main advantages:
- Security: Credentials travel securely over the local network, the system is resistant to sniffing and replay attacks.
- Convenience: Users need to introduce credentials only once. The other authentication tickets are obtained transparently.
Zentyal Services currently compatible with Kerberos authorization:
- File Sharing (SMB/CIFS)
- Electronic mail
- HTTP Proxy
Changing the user password
Zentyal administrator can change the password of any user from the web interface. In most cases, however, it is more convenient that the user has the means to change his/her password without having to notify the administrator. This can be done in a few different ways:
If the user has a Windows client joined to the Samba domain, the user can directly change the password after having logged in as a domain user by clicking CTRL + ALT + DEL. This change will be reflected on the server.
From the SOGo webadmin.
On a Linux client, the user must install the heimdal-clients package and then run:
$ kinit <user>@DOMAIN
$ kpasswd
For example:
$ kinit user1@ZENTYAL-DOMAIN.LAN
user1@ZENTYAL-DOMAIN.LAN's Password:
$ kpasswd
user1@ZENTYAL-DOMAIN.LAN's Password:
New password:
Verify password - New password:
Success : Password changed
Group Policy Objects (GPO)
The Group Policy Objects (GPOs) are policies associated to containers of the Domain.
By using GPOs you can autoconfigure and enforce policies for the client computers. You can establish global policies for the whole domain or specific policies for Organizational Units or Sites (physical locations).
Typical uses of the GPOs include:
- Installation and upgrade of software packages without user intervention.
- Configuration of a HTTP Proxy in the browsers and installation of the Certification Authority of the domain.
- Deployment of scripts that will be executed in the client at login and/or logout.
- Limiting part of the Windows client configuration to the user.
You can create GPOs with any Windows client joined to the domain. To accomplish this, you need to install the Microsoft RSAT tools, log in with the Domain Admin user account and then design the desired GPO with the RSAT.
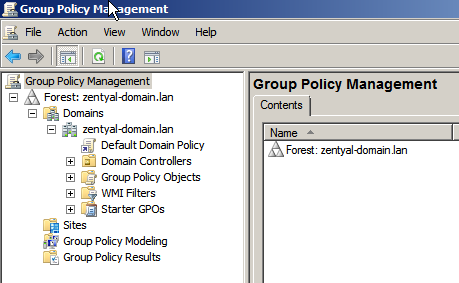
Managing the GPOs with RSAT in a Windows client
By using this tool, the GPOs will be automatically added to the domain SYSVOL and enforced by the Zentyal server on all the clients.
Warning
To adapt to the new security measures introduced in Microsoft Windows® 10, you must add in each GPO (in the Delegation tab) the groups “Authenticated Users” and “Domain Computers”.
Joining Zentyal Server to an existing domain
Thanks to the integration of Samba4 technologies, Zentyal is able to become an Additional Controller of an existing domain. This can be either by joining to a Windows Server or any other Samba4-based controller like, for example, another Zentyal server.
After joining to the domain, the LDAP information, the DNS domain associated with Samba (local domain) and Kerberos information will be transparently replicated.
There are some points to verify before joining to another controller:
- Zentyal’s local LDAP data will be destroyed since it will be overwritten with the directory information of the domain
- All the controllers have to be perfectly time synced, preferably by using NTP
- When the users are synchronized from the other domain, Zentyal will create their associated /home/<username> directories. Check that these will not collide with pre-existing home directories
- All the controllers have to belong to the same domain
- Correct DNS configuration is critical. Other domain controllers will try to push the information to the IP provided by your DNS system
If you have external IPs associated to your hostname,
(i.e. zentyal.zentyal-domain.lan), you may face synchronization issues if any of
the other controllers tries to use that IP to push data. Even if you have
several internal IPs, you may face the same problem because the DNS system
performs ‘round-robin’ by default when answering DNS queries. If this is your
case, you may want to uncomment sortlist = yes on the
/etc/zentyal/dns.conf file and restart the DNS server. This way, the DNS
system will order the IPs of the response, putting first the one that matches the
network mask of the machine making the request.
Once you have checked all the points, you can join to the domain from the menu.
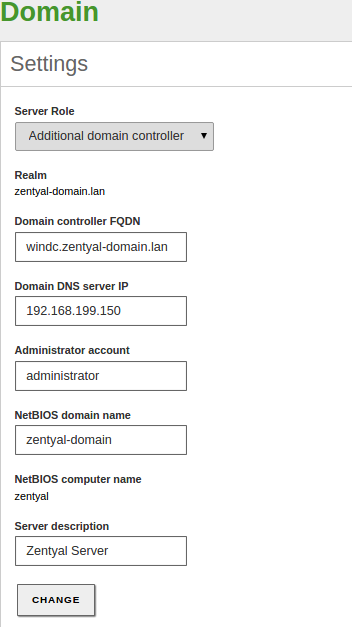
Zentyal joining to the domain as an additional controller of a Windows Server
Saving the changes will take longer than usual because Samba4 will be provisioned and all the domain information replicated.
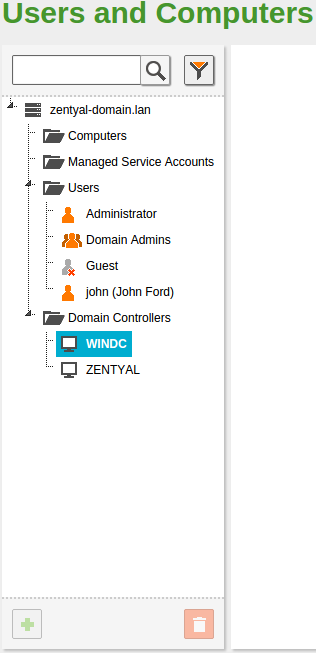
Zentyal LDAP tree synchronized with the Windows Server
When you explore the LDAP tree from the Windows Server, you will also see the new domain controller.
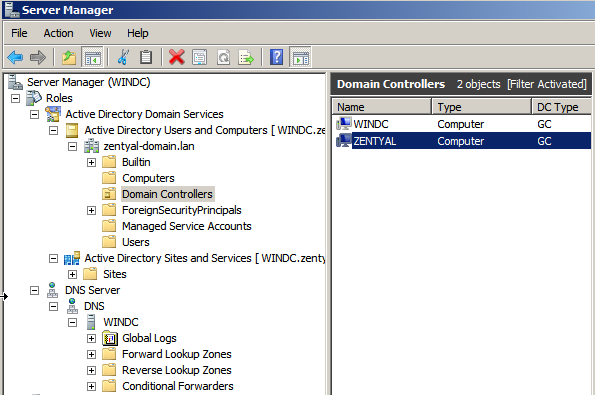
Windows® LDAP tree showing the new controller
From now on the LDAP information, the DNS domain associated to Samba (the local domain) and Kerberos will be synchronized both ways. It is possible to manage the LDAP information (users, groups, OUs...) in any of the controllers. The changes made in any of the controllers will be replicated automatically to the other controllers.
The process of joining to another Zentyal server is exactly the same.
Warning
The directory SYSVOL, and therefore, the GPOs will not synchronize automatically between domain controllers. The Samba Team proposes a number of workarounds [12].
Warning
Keep in mind that when you configure your Zentyal server as an Additional Domain controller, the “Configuration Backup” feature will work fully only if the StandAlone Domain Controller is active and functional.
| [12] | Sysvol replication: https://wiki.samba.org/index.php/Rsync_based_SysVol_replication_workaround |
Total Migration
All the domain controllers have replicated the domain information mentioned previously. However, there are some specific roles that belong to a specific server host. These are called FSMO roles or Operations Masters.
The Operation Masters are critical to the domain operation. There are five FSMO roles:
- Schema master: In charge of the definition of the LDAP tree, pushes updates of the LDAP format
- Domain naming master: Creates and deletes the domains in the forest
- Infrastructure master: Provides domain-unique GUID, SID and DN identifiers
- Relative ID Master: Relative IDs assigned to the Security Principals
- PDC Emulator: Compatibility with Windows® 2000/2003 hosts, root time server
Using the Total Migration script, you can transfer all these roles to a Zentyal server joined to the domain.
Warning
Joining a DC to a domain synchronizes the Samba4 database (users, groups, computers and other LDAP objects with all their attributes). The process of transferring the FSMO roles from one DC to another “only” modifies certain records in the Samba4 database making it the DC that now manages all (or some) of the critical LDAP operations (such as changes in the schema, etc.)
From the /usr/share/zentyal-samba directory you execute:
administrator@zentyal:/usr/share/zentyal-samba$ sudo ./ad-migrate
WARNING: This script will transfer all FSMO roles from the current owners to
         the local server.
         After all roles has been successfully transferred, you can shutdown
         the other domain controllers.
Do you want to continue [Y/n]? Y

Checking server mode...

Checking if server is provisioned...

Synchronizing sysvol share...
syncing[SYSVOL] files and directories including ACLs, without DOS Attributes

Transferring FSMO roles...
Transferring Schema Master role from owner: CN=NTDS Settings,...
Transferring Domain Naming Master role from owner: CN=NTDS Settings,...
Transferring PDC Emulation Master role from owner: CN=NTDS Settings,...
Transferring RID Allocation Master role from owner: CN=NTDS Settings,...
Transferring Infrastructure Master role from owner: CN=NTDS Settings,...

Migrated successfully!
From now on Zentyal is the only critical controller in the domain and all the features should continue working even if you turn off the others controllers, save scalability and network considerations.
Warning
If you go to the menu, you can see that the Zentyal web GUI doesn’t show this configuration change. However, your Domain Controller is now the owner of all the FSMO roles. You can confirm this with the ‘samba-tool fsmo show‘ command and see that it is running as expected. Be careful not to change any default setting because this will cause you to loose all the data related to the domain controller.
Importing and exporting users and groups
To help you to import and export users and groups, Zentyal provides the following
scripts that allow you to carry out these tasks. If you have Commercial Zentyal
Edition, you can do this directly from the GUI
(Users and Computers –> Import/Export). Otherwise, you will have to
execute manually the scripts located in /usr/share/zentyal-samba/.
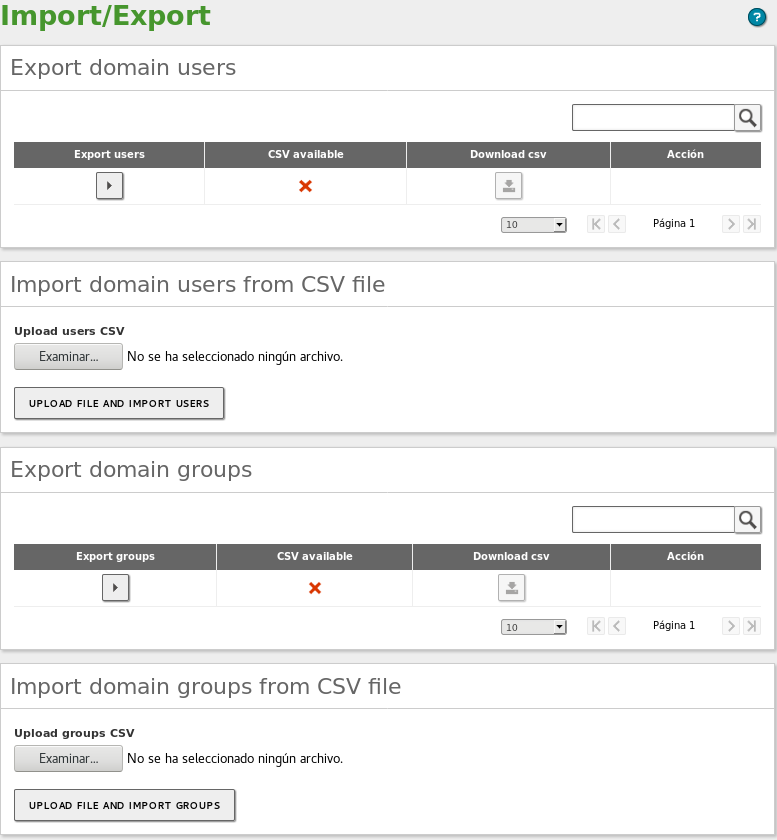
User import and export options in Commercial Editions
Exporting
From the Export domain section, you can export both the domain controller users and groups. To export this data, you have to click on the icon below the Export menu. Once the process has finished, the icon under the CSV available column will change to a green circle and you will be able to download the .csv file by clicking on the icon under the Download csv column.
Importing
To import new users or groups to the domain, first you must upload the .csv file to the Zentyal server. To do this, click the Examine icon and select the file. Then, click on the UPLOAD FILE AND IMPORT button. Once the process has finished, you can see that the users and groups are available in the Users and Computers –> Manage section.
.csv file format
Below you can see the .csv file formats you have to use in order to import users and groups.
The file format for groups:
name;CN;Description;email;typeOfGroup;idGroup
Warning
‘typeOfGroup‘ can take the following values: 0 for security groups and 1 for distribution groups. The ‘idGroup‘ is used only for security groups.
Some examples of a .csv file for groups:
## For groups type: Security group

devsecops;OU=sysadmins,DC=lab61,DC=lan;Dev Sec Ops;devsecops@lab61.lan;1;;3112;

## For groups type: Distribution group

news;CN=Groups,DC=zentyal-domain,DC=lan;News;news@zentyal-domain.lan;0;;;
The format for users:
## In a single line
username;CN;firstName;;lastName;displayName;Description;email;password;;IDnumber;
CN-GroupBelong:CN-GroupBelong
Some examples of a .csv file for users:
## In a single line

## For a simple user

alba;CN=Users,DC=zentyal-domain,DC=lan;Alba;;Hernandez;Alba Hernandez;;"";
password;;65540;CN=news,CN=Groups,DC=zentyal-domain,DC=lan:CN=rrhh,CN=Users,
DC=zentyal-domain,DC=lan;

## For an user with all the fiels filled

maria;OU=sysadmins,DC=zentyal-domain,DC=lan;Maria maria;;Jimenez;Maria Jimenez;
Developer;"maria@zentyal-domain.lan";password;;65537;CN=devsecops,OU=sysadmins,
DC=zentyal-domain,DC=lan:CN=news,CN=Groups,DC=zentyal-domain,DC=lan;
User import and export limitations
- The account passwords can not be exported. The .csv file uses the string password as the default password.
- Organizational Units are not exported. Therefore, before importing a .csv file that contains any OU, you must create the OU previously.
- Non-ASCII characters such as accents will not be exported correctly. Therefore, you should edit these entries in the .csv file before importing.
- The .csv files generated by the export scripts contain the domain as CN. Therefore, the data import will fail if the new server does not have the same domain name configured. However, you can modify this value in the .csv files.
- In case you want to import users or groups that contain the configured email, you need to disable the Mail option of the user template (Users and Computers –> User Template).
User template
- If you have multiple virtual mail domains, you need to split the users and groups in different .csv files. Then, you need to set the virtual mail domain which contains the .csv file from the menu . Otherwise, all the users and groups will be created with the same virtual mail domain.
Know Limitations
It’s important to check the list of current known Samba4 limitations before planning your domain:
- Only one domain, in a single forest. Samba doesn’t support multiple domains or multiple forests
- Functional Domain level of the forest and the domain has to be min. 2003 R2, current max. 2008 R2
- Your hostname can not match your NETBIOS name. The NETBIOS name is generated using the left part of the domain. For example, if your hostname is ‘zentyal’, your domain can not be ‘zentyal.lan’, but it could be ‘zentyal-domain.lan’
- Trust relationships between domains and forests are not supported
- GPOs can not be synced automatically, but can be configured manually following the official Samba documentation [13]
- Users with non-ASCII names are not supported (accent marks, hyphen, special characters)
| [13] | Sysvol workaround: https://wiki.samba.org/index.php/Rsync_based_SysVol_replication_workaround |
Known issues
To enable the access to the shares for some Windows systems and devices, such as network printers, you will have to add the following configuration parameter to your Samba configuration:
ntlm auth = yes
Warning
By enabling this parameter you could be weakening the security of your Domain Controller.