OpenVPN Configuration as RoadWarrior
In this entry, we will explain how to configure a Zentyal server as a VPN server for Roadwarrior type clients using the OpenVPN module [1].
Table of Contents
| [1] | OpenVPN: module https://doc.zentyal.org/en/vpn.html |
Considerations
Before configuring our VPN server, we need to keep the following considerations in mind:
- The server already has the Domain Controller module [2] configured, which contains some information we use for the final tests of the article.
- The port used for the OpenVPN module is 11194/UDP.
- The network range for the VPN is 192.168.199.0/24.
- The network interface that receive VPN requests is external.
- The internal network we announce is 192.168.80.0/24.
- If the Zentyal server is behind a device like a router, it will be necessary to configure a Port-forwarding rule on that device.
| [2] | Domain Controller: https://doc.zentyal.org/en/directory.html |
Laboratory Environment
The laboratory environment on which we conduct tests has the following characteristics:
- Version → Zentyal 8.0
- Installed modules → Network, Firewall, Logs, NTP, DNS, Domain Controller.
- Hostname → zentyal
- Domain name → zentyal-domain.lan
- External network interface: eth0 → DHCP
- Internal network interface: eth1 → 192.168.80.10/24
- Domain users → maria
- Shared resources → accounting
- Client machines → Windows 11 y Ubuntu Desktop 22.04
Zentyal Server Configuration
Next, we are going to install and configure the necessary modules on our Zentyal server.
Module Installation
The first thing is install the necessary modules:
- We log in to the Zentyal server management panel, then go to Software Management -> Zentyal Components, select the VPN module, and click on INSTALL. The [3] CA module will also be installed as a dependency.
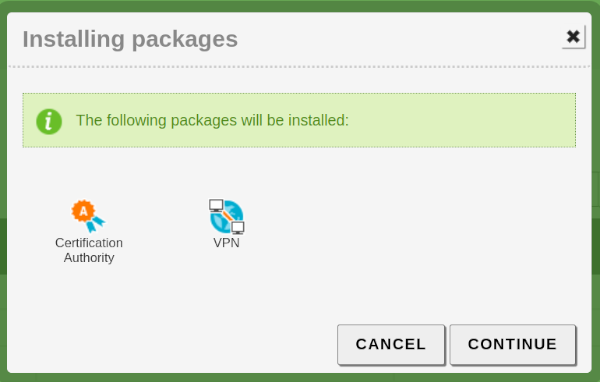
Module installation
- Once the installation is complete, we go to Module Status, select the VPN module to enable it, and then save changes.
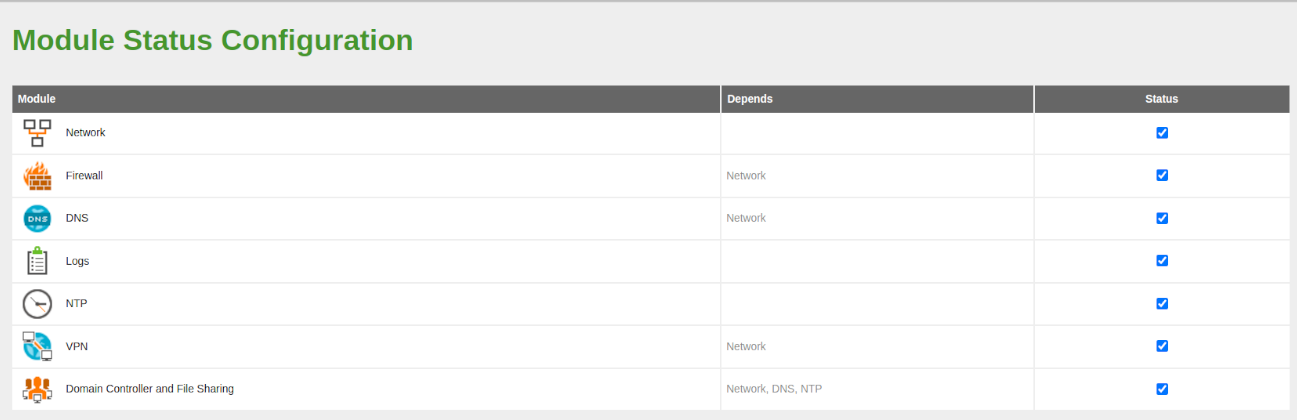
Module status
| [3] | Certification Authority Module: https://doc.zentyal.org/en/ca.html |
Certification Authority Module
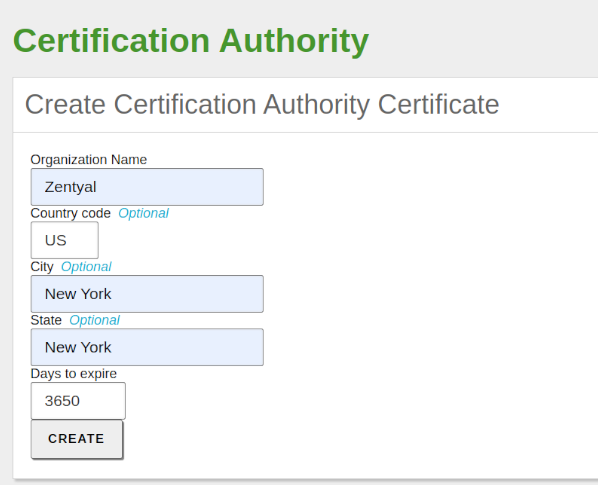
At this point, we create our Certification Authority:
- We create the Certification Authority from Certification Authority -> General.
Creation of the Certification Entity
- Once the changes are saved, we are able to see the CA certificate from Current Certificate List, which will be necessary to create any certificate needed for our OpenVPN module.

Certificate for CA
Warning
Any certificate issued by the newly created CA will not be recognized by third-party software such as web browsers or email clients. This is because the CA is not official. However, traffic will be encrypted.
Network Module
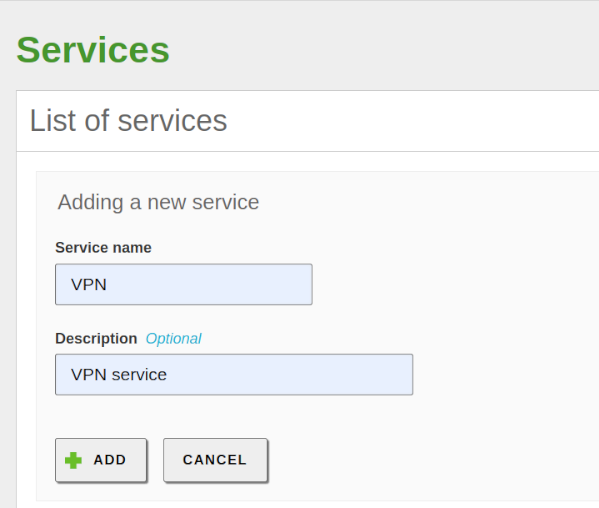
The next step is to create both the service [4] - the protocol and port that the VPN will use - that we will later enable in the Firewall, and the network object [5] - the network that will announce the service - for our VPN server:
- From Network -> Services, click on ADD NEW, fill in the fields, and click ADD.
VPN Service
- Now we can see it in the list of services, click on the Configuration button and then on ADD NEW.
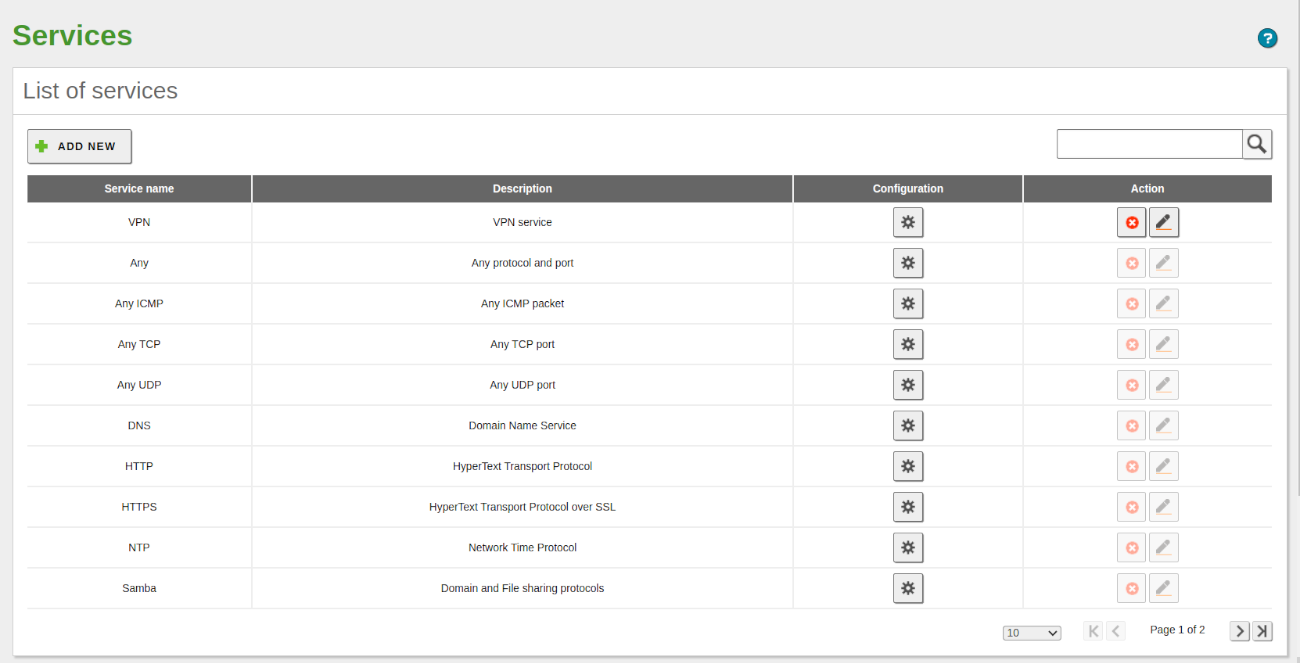
List of Services
- Configure the necessary parameters and click ADD. Finally, save changes.

VPN Service Configuration
- Go to Network -> Objects and click on ADD NEW. Name it InternalNetwork and click on ADD. Once created, we can see the list of all network objects, including those automatically created by Zentyal when we created our VPN server.
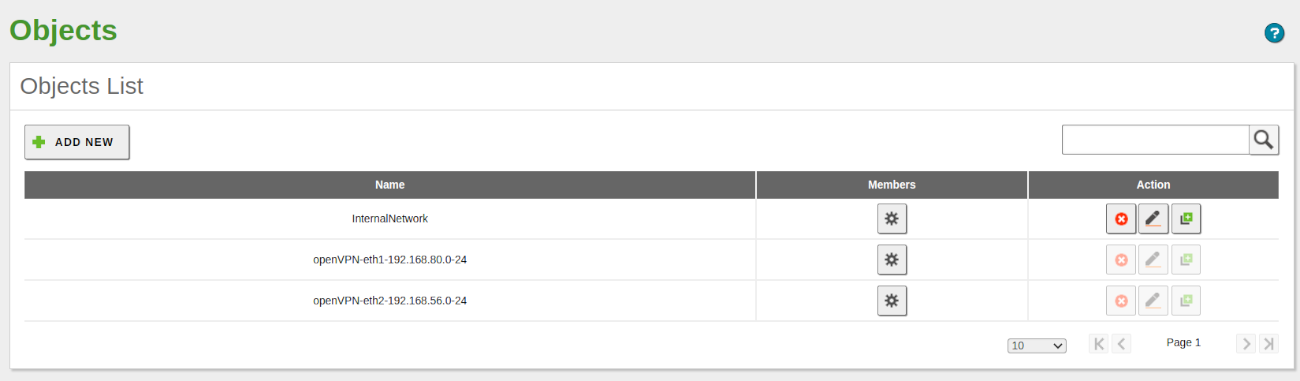
List of Network Objects
- Click on the Members button and then on ADD NEW. Once configured, save changes.

Network Object Member
| [4] | Network Module Service: https://doc.zentyal.org/en/abstractions.html#network-services |
| [5] | Network Object of the Network Module: https://doc.zentyal.org/en/abstractions.html#network-objects |
Firewall Module
Now we configure the firewall [6] to allow the previously created VPN service:
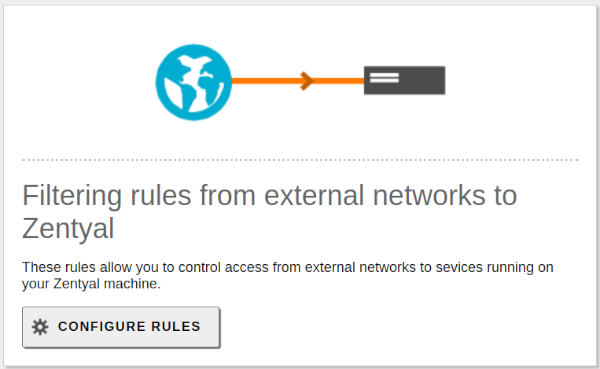
- In the Firewall -> Packet Filtering section, select Filtering Rules from External Networks to Zentyal.
Filtering Rules from External Networks to Zentyal
Warning
If the network interface from which we will receive VPN requests is internal, the firewall section will be Filtering Rules from Internal Networks to Zentyal.
- Click on ADD NEW, configure the rule, and save the changes:
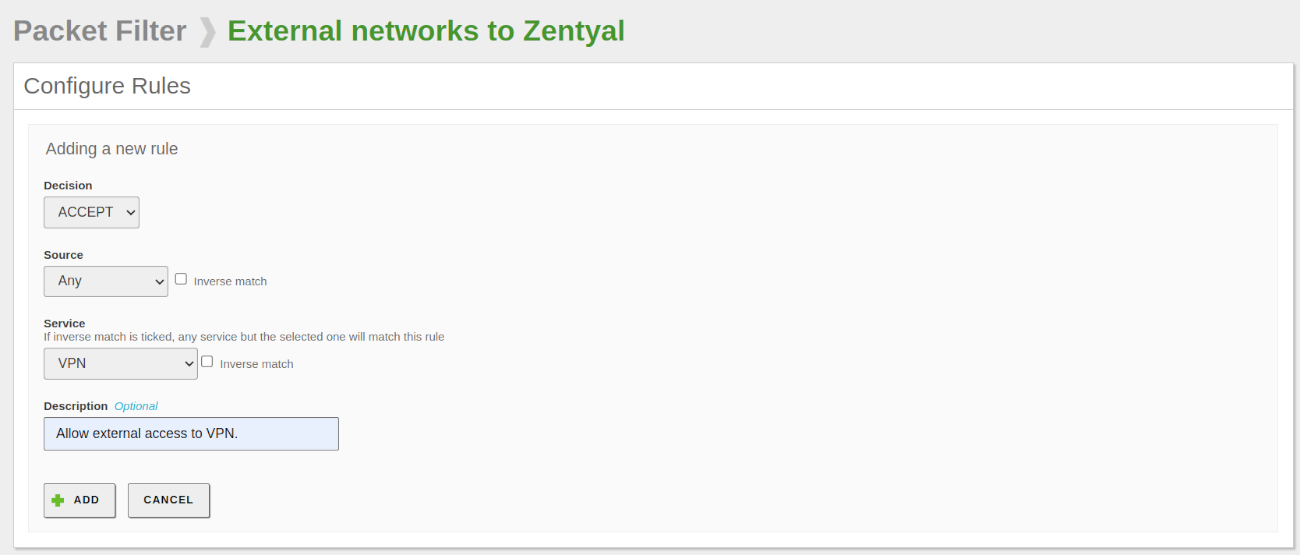
Firewall Configuration
| [6] | Firewall Module: https://doc.zentyal.org/en/firewall.html |
VPN Module
The next step is to create and configure our VPN:
- To do this, go to VPN -> Servers, click on ADD NEW, give it a name, and finally, click on ADD.
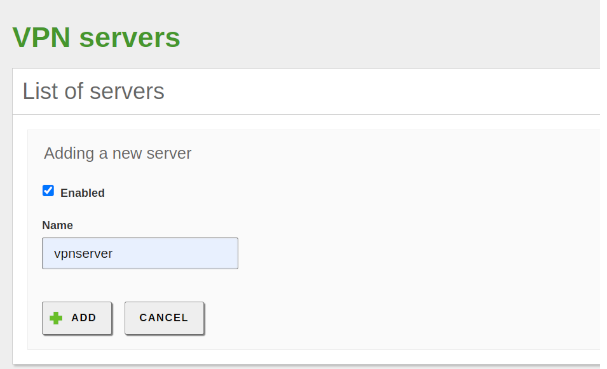
VPN Server Name
- The screen shows us the List of Servers.

List of VPN Servers
- Click on the Configuration button and configure the VPN. We configure the following: server port and VPN Address.
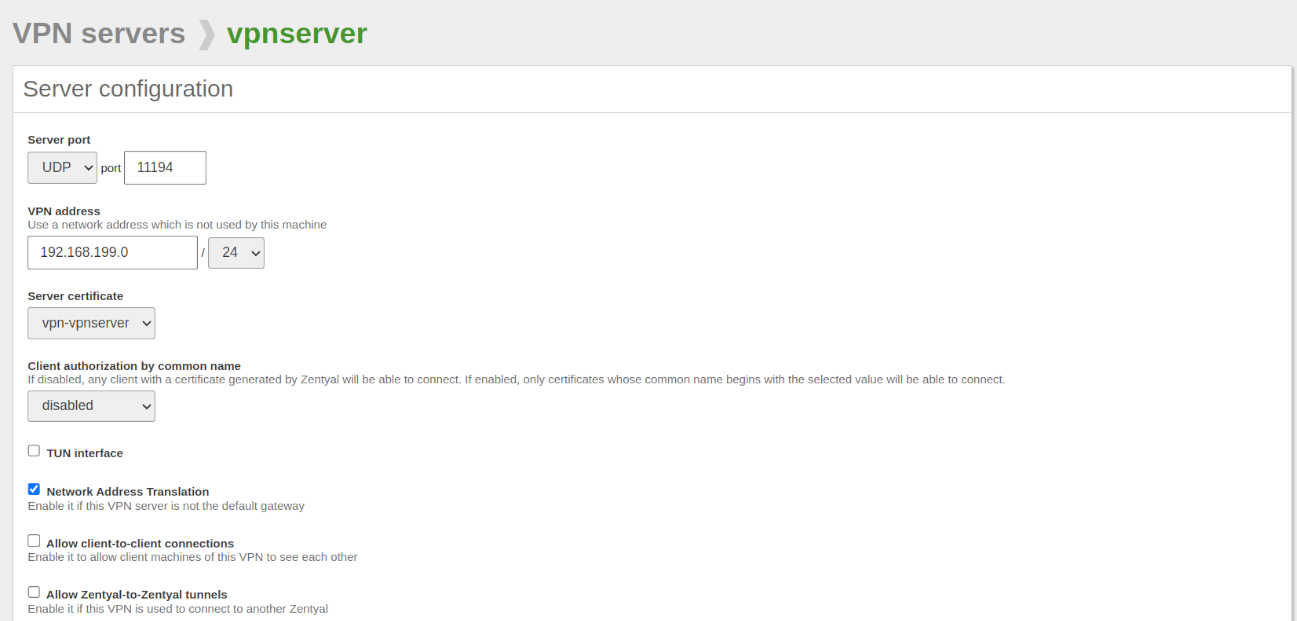
VPN Server Configuration
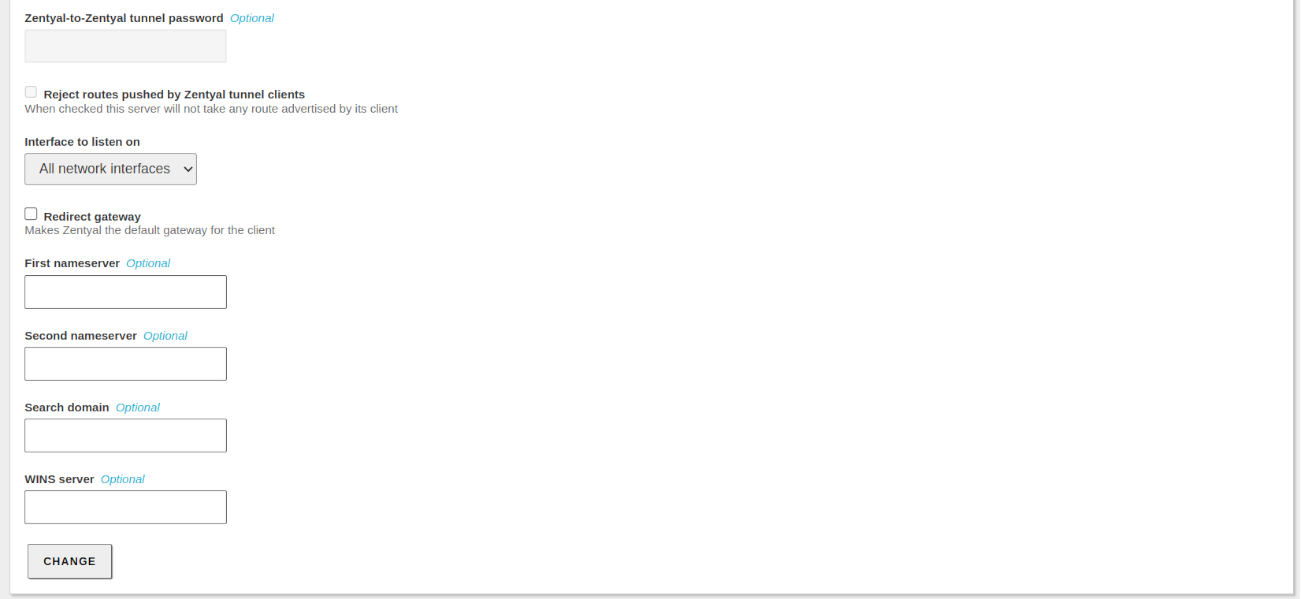
VPN Server Configuration
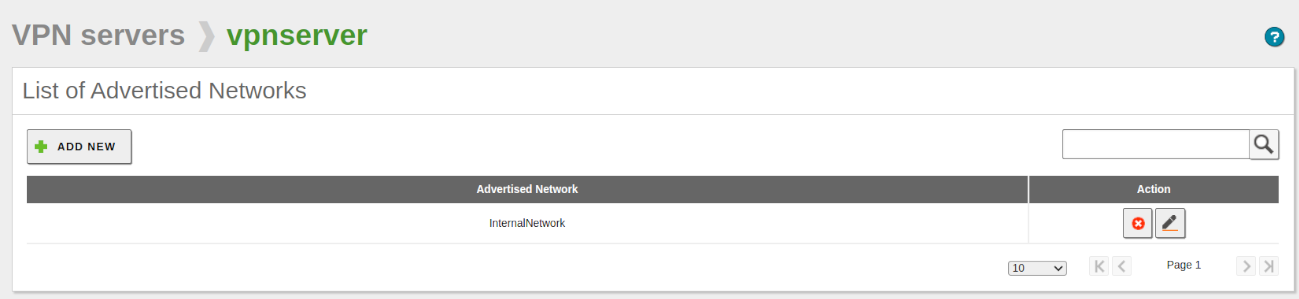
- The next step is to configure the advertised networks that our Zentyal server will publish. To do this, go to VPN -> Servers, locate our server, and click on the Advertised Networks button. A list of the advertised networks appears, including the network objects automatically created by Zentyal.
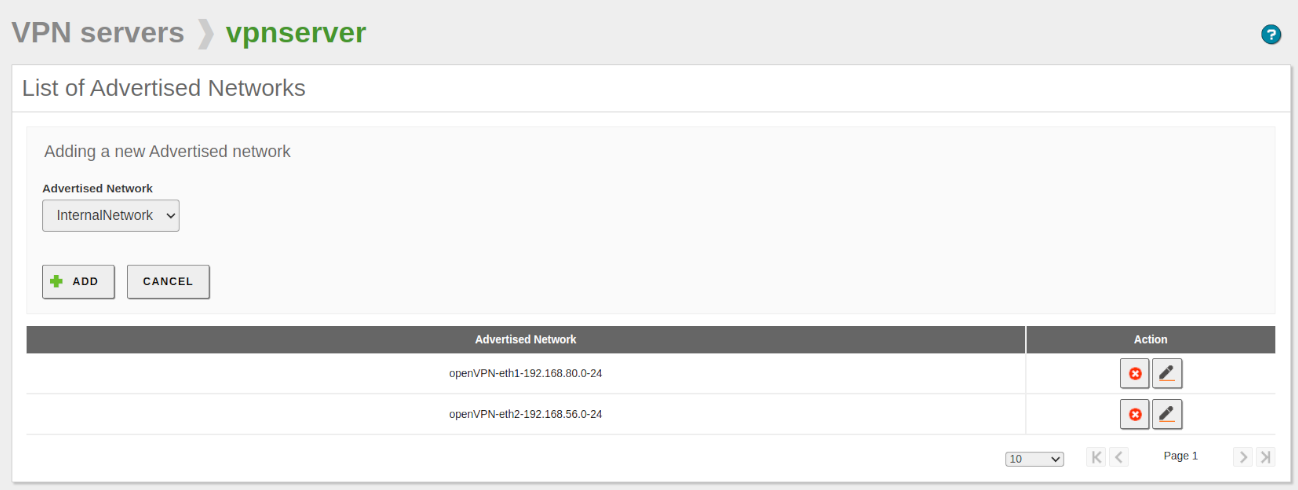
List of Advertised Networks
- We delete the ones that the system included automatically, add the network object created earlier, and save the changes, resulting in the following configuration.
Advertised Internal Network
Finally, we check the status of the service from the command line.
We confirm that the module is active:
sudo zs openvpn status

   status module openvpn:                 [ RUNNING ]
We confirm that the created VPN service is also active:
sudo systemctl status ebox.openvpn.server.vpnserver.service

   ebox.openvpn.client.vpnserver.service
   Loaded: loaded (/lib/systemd/system/ebox.openvpn.client.vpnserver.service;
   static)
   Active: active (running) since Mon 2024-08-29 11:59:11 CEST; 12min ago
   Main PID: 4045 (openvpn)
      Tasks: 1 (limit: 3418)
   Memory: 3.0M
      CPU: 17ms
   CGroup: /system.slice/ebox.openvpn.client.vpnserver.service
            └─4045 /usr/sbin/openvpn --syslog vpnserver --config
                     /etc/openvpn/vpnserver.d/vpnserver.conf

   aug 29 11:59:11 zentyal systemd[1]: Started
      ebox.openvpn.client.vpnserver.service.
We confirm the new network interface and its configuration:
ip -4 a

   tap0: <BROADCAST,MULTICAST,UP,LOWER_UP> mtu 1500 qdisc fq_codel state
   UNKNOWN group default qlen 1000
      inet 192.168.199.1/24 scope global tap0
         valid_lft forever preferred_lft forever
Logging Module
We log the connections received to our service in the Logging module [7].
- Enable the logging module if it is not already enabled from Module Status.
- Enable the VPN domain from Logs -> Configure Logs and save the changes.
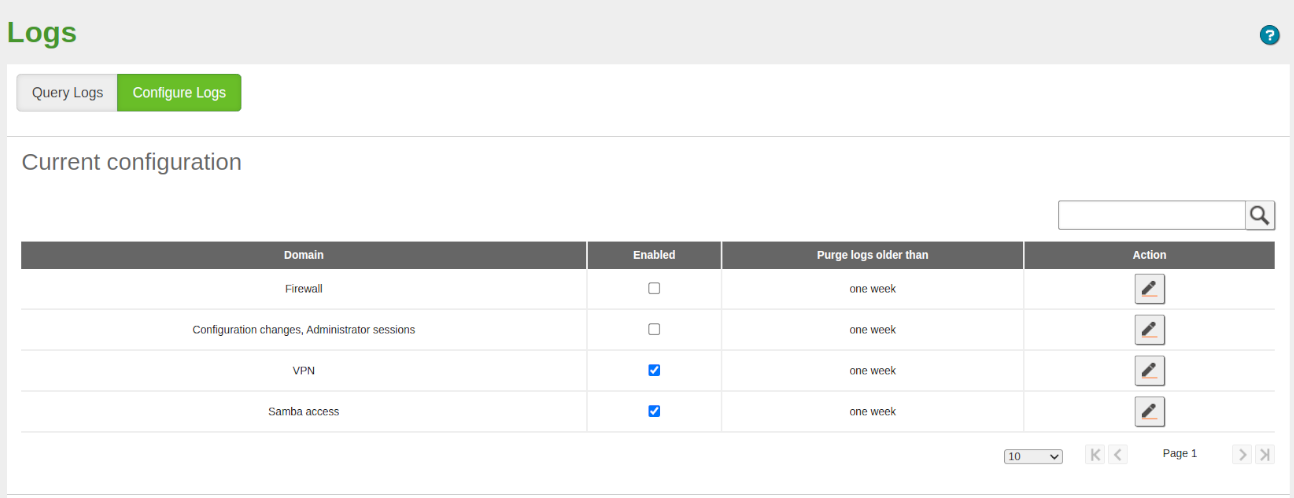
Enable VPN Service Logs.
| [7] | Logging Module: https://doc.zentyal.org/en/log.html |
VPN Widget Configuration
Finally, we configure the Dashboard of the administration panel with the VPN-related widgets, so that we can quickly see the status of the module and connected clients.
- In the upper right corner, click on the Configure Widgets button, then click on the VPN tab, and finally, drag the vpnserver field to the place where we want it to appear. We do the same for OpenVPN daemons if it is not already available.

VPN Widget Configuration
- In our case, we move it below the OpenVPN Daemons widget, resulting in the following arrangement.
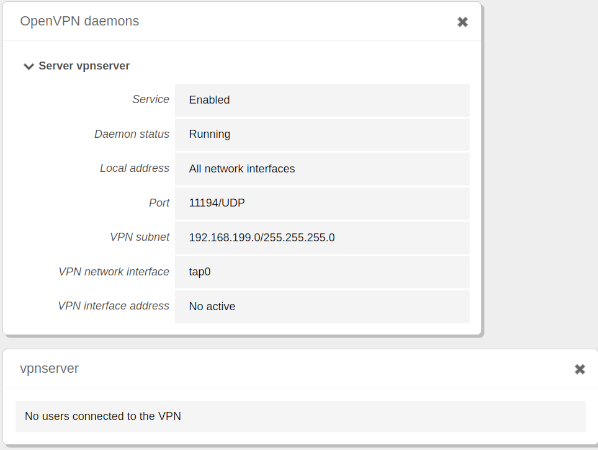
VPN Widget
Client Configuration
The following explains the client configuration on two types of operating systems: Windows 11 and Ubuntu Desktop 22.04.
General
The following actions are general for both clients.
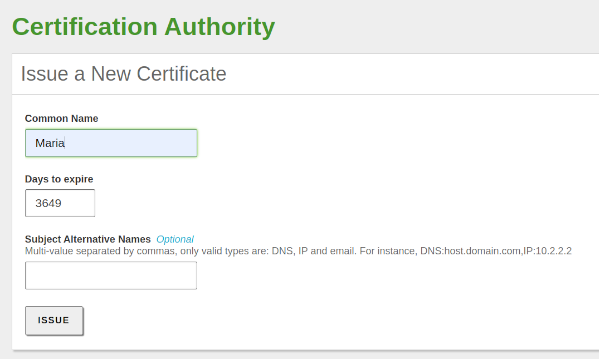
- From the module Certification Authority -> General, we issue a new certificate for our client:
Client Certificate
- Once issued, we can see it in the certificate list.
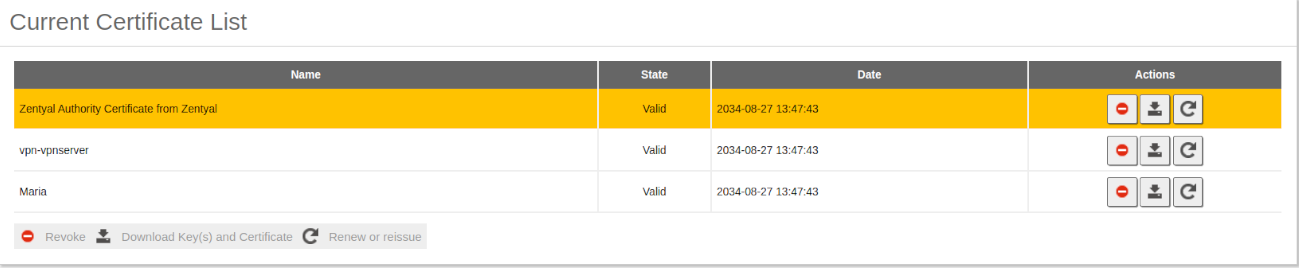
Certificate List
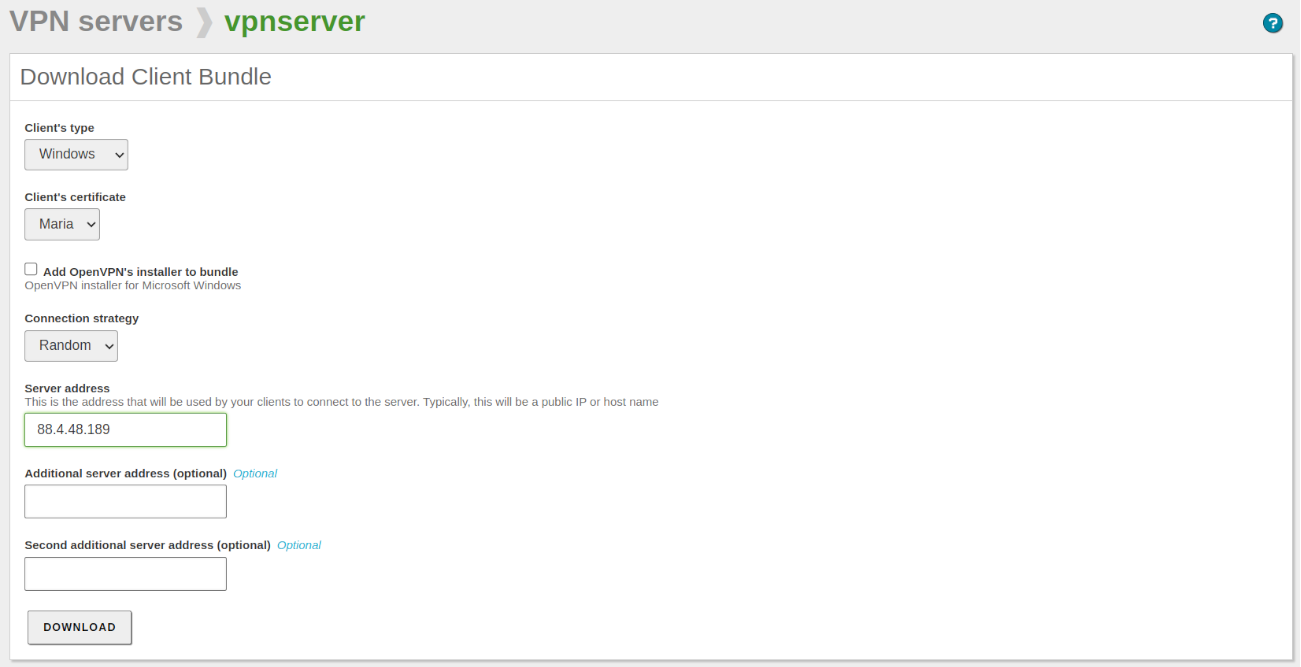
- Now we go to the module VPN -> Servers and click the Download bundle button. We fill in the fields for the desired client and click on DOWNLOAD.
Client Bundle
Warning
For the client to be able to connect, the set IP address must be publicly accessible. If the entered IP belongs to the router, it will be necessary to set a port-forwarding rule.
Windows
On our client with Windows 11, we perform the following steps:
- We copy the previously downloaded bundle to the computer and extract it.
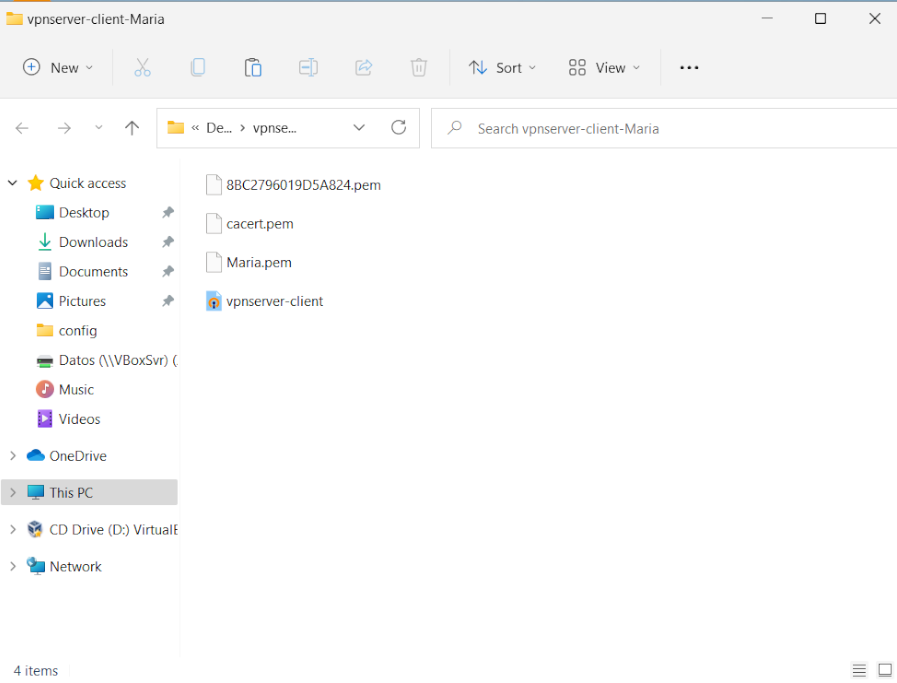
Bundle Directory
- We install the OpenVPN software using the .msi file included in the bundle and follow the Windows wizard.
- Once the software is installed, we copy the contents of the bundle directory except for the installer to the path C:\Users\<our_user>\OpenVPN\config.
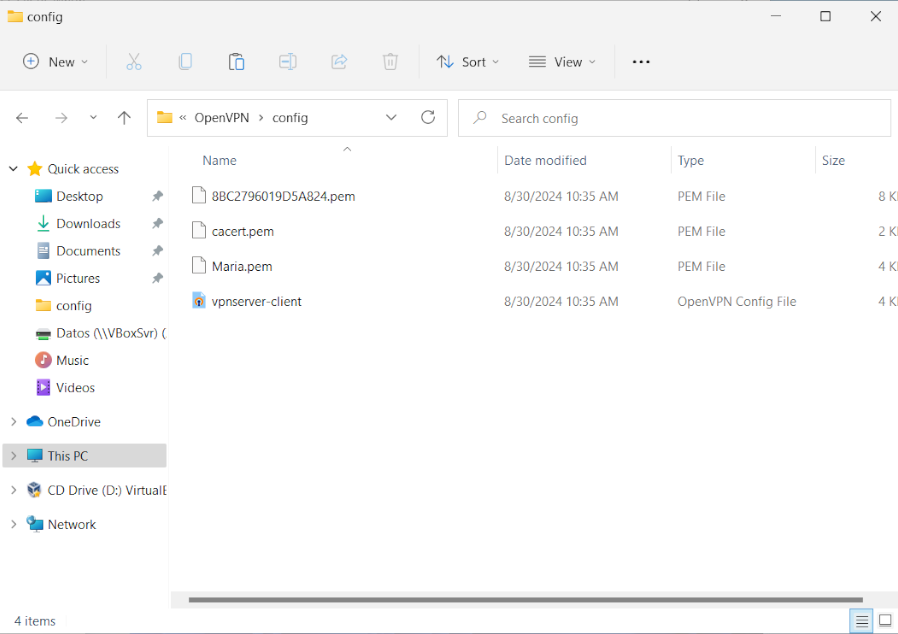
Windows Client Configuration
Warning
Replace <our_user> with the Windows username.
With the configuration set in the correct directory, we proceed to establish the VPN connection from OpenVPN GUI -> Connect (icon on the desktop).
We check -through various means- that the connection has been successfully established:
From the log of the OpenVPN software on the Windows client:
2024-08-29 12:16:20 TCP/UDP: Preserving recently used remote address:
[AF_INET]88.4.48.189:11194
2024-08-29 12:16:20 Socket Buffers: R=[65536->65536] S=[65536->65536]
2024-08-29 12:16:20 UDPv4 link local: (not bound)
2024-08-29 12:16:20 UDPv4 link remote: [AF_INET]88.4.48.189:11194
2024-08-29 12:16:20 MANAGEMENT: >STATE:1724933780,WAIT,,,,,,
2024-08-29 12:16:20 MANAGEMENT: >STATE:1724933780,AUTH,,,,,,
2024-08-29 12:16:20 TLS: Initial packet from [AF_INET]88.4.48.189:11194,
sid=53c13931 236aeeff
2024-08-29 12:16:20 VERIFY OK: depth=1, C=US, ST=New York, L=New York,
O=Zentyal, CN=Zentyal Authority Certificate
2024-08-29 12:16:20 VERIFY X509NAME OK: C=US, ST=New York, L=New York,
O=Zentyal, CN=vpn-vpnserver
2024-08-29 12:16:20 VERIFY OK: depth=0, C=US, ST=New York, L=New York,
O=Zentyal, CN=vpn-vpnserver
2024-08-29 12:16:20 Control Channel: TLSv1.3, cipher TLSv1.3 TLS_AES_256_GCM_SHA384, peer certificate: 4096 bits RSA, signature: RSA-SHA256, peer temporary key: 253 bits X25519
2024-08-29 12:16:20 [vpn-vpnserver] Peer Connection Initiated with
[AF_INET]88.4.48.189:11194
2024-08-29 12:16:20 TLS: move_session: dest=TM_ACTIVE src=TM_INITIAL
reinit_src=1
2024-08-29 12:16:20 TLS: tls_multi_process: initial untrusted session
promoted to trusted
2024-08-29 12:16:20 PUSH: Received control message: 'PUSH_REPLY,route
192.168.80.0 255.255.255.0,route-gateway 192.168.199.1,ping 10,
ping-restart 120,ifconfig 192.168.199.2 255.255.255.0,peer-id 0,
cipher AES-256-GCM'
2024-08-29 12:16:20 OPTIONS IMPORT: --ifconfig/up options modified
2024-08-29 12:16:20 OPTIONS IMPORT: route options modified
2024-08-29 12:16:20 OPTIONS IMPORT: route-related options modified
2024-08-29 12:16:20 interactive service msg_channel=492
2024-08-29 12:16:20 ROUTE_GATEWAY 192.168.145.65/255.255.255.0 I=12
HWADDR=08:00:27:60:90:85
2024-08-29 12:16:20 open_tun
2024-08-29 12:16:20 tap-windows6 device [OpenVPN TAP-Windows6] opened
2024-08-29 12:16:20 TAP-Windows Driver Version 9.26
2024-08-29 12:16:20 Notified TAP-Windows driver to set a DHCP IP/netmask
of 192.168.199.2/255.255.255.0 on interface
{4B0C40D5-4032-411B-B8A2-18AFE97E859C} [DHCP-serv:
192.168.199.0, lease-time: 31536000]
2024-08-29 12:16:20 Successful ARP Flush on interface [20]
{4B0C40D5-4032-411B-B8A2-18AFE97E859C}
2024-08-29 12:16:20 MANAGEMENT: >STATE:1724933780,ASSIGN_IP,
,192.168.199.2,,,,
2024-08-29 12:16:20 IPv4 MTU set to 1500 on interface 20 using service
2024-08-29 12:16:20 Data Channel: cipher 'AES-256-GCM', peer-id: 0,
compression: 'lzo'
2024-08-29 12:16:20 Timers: ping 10, ping-restart 120
2024-08-29 12:16:20 Protocol options: explicit-exit-notify 3
2024-08-29 12:16:25 TEST ROUTES: 1/1 succeeded len=1 ret=1 a=0
u/d=up
2024-08-29 12:16:25 MANAGEMENT: >STATE:1724933785,ADD_ROUTES,,,,,,
2024-08-29 12:16:25 C:\Windows\system32\route.exe ADD 192.168.80.0
MASK 255.255.255.0 192.168.199.1
2024-08-29 12:16:25 Route addition via service succeeded
2024-08-29 12:16:25 Initialization Sequence Completed
2024-08-29 12:16:25 MANAGEMENT: >STATE:1724933785,CONNECTED,
SUCCESS,192.168.199.2,88.4.48.189,11194,,
From the Windows console, we check the configuration of the OpenVPN network interface:
ipconfig /all

Unknown adapter OpenVPN TAP-Windows6:

   Connection-specific DNS Suffix  . :
   Link-local IPv6 Address . . . . . : fe80::bfa3:9294:2cd9:ba13%6
   IPv4 Address. . . . . . . . . . . : 192.168.199.2
   Subnet Mask . . . . . . . . . . . : 255.255.255.0
   Default Gateway . . . . . . . . . :
From the widget:
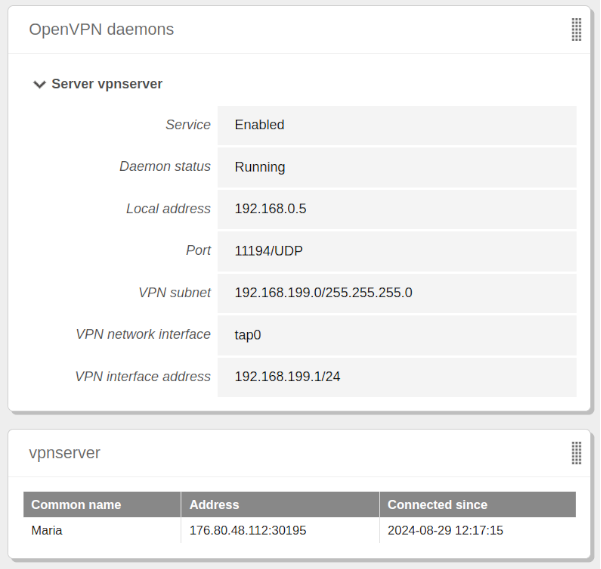
Checking from the Zentyal widget
From the Zentyal log
/var/log/openvpn/vpnserver.log:2024-08-29 12:16:16 176.80.48.112:30102 TLS: Initial packet from [AF_INET]176.80.48.112:30102, sid=5a469a39 6fc5cf68 2024-08-29 12:16:16 176.80.48.112:30102 VERIFY OK: depth=1, C=US, ST=New York, L=New York, O=Zentyal, CN=Zentyal Authority Certificate 2024-08-29 12:16:16 176.80.48.112:30102 VERIFY OK: depth=0, C=US, ST=New York, L=New York, O=Zentyal, CN=Maria 2024-08-29 12:16:16 176.80.48.112:30102 peer info: IV_VER=2.6.8 2024-08-29 12:16:16 176.80.48.112:30102 peer info: IV_PLAT=win 2024-08-29 12:16:16 176.80.48.112:30102 peer info: IV_TCPNL=1 2024-08-29 12:16:16 176.80.48.112:30102 peer info: IV_MTU=1600 2024-08-29 12:16:16 176.80.48.112:30102 peer info: IV_NCP=2 2024-08-29 12:16:16 176.80.48.112:30102 peer info: IV_CIPHERS=AES-256-GCM: AES-128-GCM:CHACHA20-POLY1305 2024-08-29 12:16:16 176.80.48.112:30102 peer info: IV_PROTO=990 2024-08-29 12:16:16 176.80.48.112:30102 peer info: IV_LZ4=1 2024-08-29 12:16:16 176.80.48.112:30102 peer info: IV_LZ4v2=1 2024-08-29 12:16:16 176.80.48.112:30102 peer info: IV_LZO=1 2024-08-29 12:16:16 176.80.48.112:30102 peer info: IV_COMP_STUB=1 2024-08-29 12:16:16 176.80.48.112:30102 peer info: IV_COMP_STUBv2=1 2024-08-29 12:16:16 176.80.48.112:30102 peer info: IV_GUI_VER= OpenVPN_GUI_11.46.0.0 2024-08-29 12:16:16 176.80.48.112:30102 peer info: IV_SSO=openurl, webauth,crtext 2024-08-29 12:16:16 176.80.48.112:30102 WARNING: 'tun-mtu' is used inconsistently, local='tun-mtu 1532', remote='tun-mtu 1500' 2024-08-29 12:16:16 176.80.48.112:30102 Control Channel: TLSv1.3, cipher TLSv1.3 TLS_AES_256_GCM_SHA384, peer certificate: 4096 bit RSA, signature: RSA-SHA256 2024-08-29 12:16:16 176.80.48.112:30102 [Maria] Peer Connection Initiated with [AF_INET]176.80.48.112:30102 2024-08-29 12:16:16 Maria/176.80.48.112:30102 MULTI_sva: pool returned IPv4=192.168.199.2, IPv6=(Not enabled) 2024-08-29 12:16:16 Maria/176.80.48.112:30102 Data Channel: using negotiated cipher 'AES-256-GCM' 2024-08-29 12:16:16 Maria/176.80.48.112:30102 Outgoing Data Channel: Cipher 'AES-256-GCM' initialized with 256 bit key 2024-08-29 12:16:16 Maria/176.80.48.112:30102 Incoming Data Channel: Cipher 'AES-256-GCM' initialized with 256 bit key 2024-08-29 12:16:16 Maria/176.80.48.112:30102 SENT CONTROL [Maria]: 'PUSH_REPLY, route 192.168.80.0 255.255.255.0,route-gateway 192.168.199.1,ping 10, ping-restart 120,ifconfig 192.168.199.2 255.255.255.0,peer-id 0, cipher AES-256-GCM' (status=1) 2024-08-29 12:16:16 Maria/176.80.48.112:30102 MULTI: Learn: 00:ff:4b:0c:40:d5@0 -> Maria/176.80.48.112:30102
Finally, from the Windows client, we access the personal folder of the domain user maria and the shared resource accounting at the internal IP 192.168.80.10 of the Zentyal server that published the VPN connection.
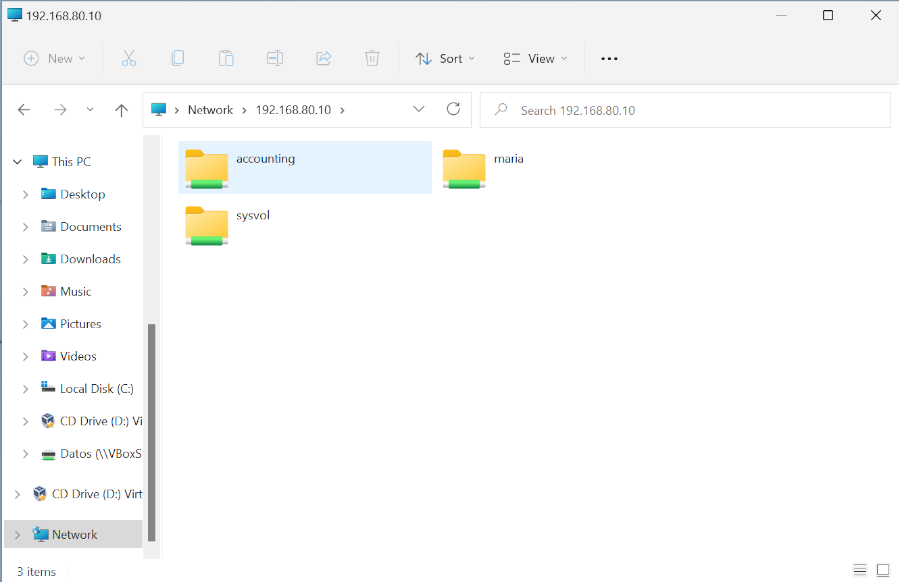
Access from the Windows client to the shared resources of the Zentyal server
Linux
On our client with Ubuntu Desktop 22.04, we perform the following steps:
We install the OpenVPN software:
sudo apt update
sudo apt install openvpn
We create the directory where the contents of the bundle will be stored:
mkdir -v vpn-roadwarrior
We copy the bundle to the machine and extract it as follows:
tar -xzvf vpnserver-client-Maria.tar.gz -C vpn-roadwarrior/
We navigate to the directory containing the configuration files:
cd vpn-roadwarrior/
We establish the VPN connection:
sudo openvpn --config vpnserver-client.conf

   Fri Aug 30 13:27:21 2024 OpenVPN 2.4.12 x86_64-pc-linux-gnu [SSL
   (OpenSSL)] [LZO] [LZ4] [EPOLL] [PKCS11] [MH/PKTINFO] [AEAD]
   built on Jun 27 2024
   Fri Aug 30 13:27:21 2024 library versions: OpenSSL 1.1.1f  31 Mar 2020,
   LZO 2.10
   Fri Aug 30 13:27:21 2024 TCP/UDP: Preserving recently used remote address:
   [AF_INET]88.4.48.189:11194
   Fri Aug 30 13:27:21 2024 Socket Buffers: R=[212992->212992]
   S=[212992->212992]
   Fri Aug 30 13:27:21 2024 UDP link local: (not bound)
   Fri Aug 30 13:27:21 2024 UDP link remote: [AF_INET]
   88.4.48.189:11194
   Fri Aug 30 13:27:21 2024 TLS: Initial packet from [AF_INET]
   88.4.48.189:11194, sid=40b2b72c 6fc01b2e
   Fri Aug 30 13:27:21 2024 VERIFY OK: depth=1, C=US, ST=New York,
   L=New York, O=Zentyal, CN=Zentyal Authority Certificate
   Fri Aug 30 13:27:21 2024 VERIFY X509NAME OK: C=US, ST=New York,
   L=New York, O=Zentyal, CN=vpn-vpnserver
   Fri Aug 30 13:27:21 2024 VERIFY OK: depth=0, C=US, ST=New York,
   L=New York, O=Zentyal, CN=vpn-vpnserver
   Fri Aug 30 13:27:21 2024 Control Channel: TLSv1.3, cipher TLSv1.3
   TLS_AES_256_GCM_SHA384, 4096 bit RSA
   Fri Aug 30 13:27:21 2024 [vpn-vpnserver] Peer Connection Initiated
   with [AF_INET]88.4.48.189:11194
   Fri Aug 30 13:27:22 2024 SENT CONTROL [vpn-vpnserver]:
   'PUSH_REQUEST' (status=1)
   Fri Aug 30 13:27:22 2024 PUSH: Received control message: 'PUSH_REPLY,route
   192.168.80.0 255.255.255.0,route-gateway 192.168.199.1,ping 10,ping-restart
   120,ifconfig 192.168.199.2 255.255.255.0,peer-id 0,cipher AES-256-GCM'
   Fri Aug 30 13:27:22 2024 OPTIONS IMPORT: timers and/or timeouts modified
   Fri Aug 30 13:27:22 2024 OPTIONS IMPORT: --ifconfig/up options modified
   Fri Aug 30 13:27:22 2024 OPTIONS IMPORT: route options modified
   Fri Aug 30 13:27:22 2024 OPTIONS IMPORT: route-related options modified
   Fri Aug 30 13:27:22 2024 OPTIONS IMPORT: peer-id set
   Fri Aug 30 13:27:22 2024 OPTIONS IMPORT: adjusting link_mtu to 1657
   Fri Aug 30 13:27:22 2024 OPTIONS IMPORT: data channel crypto options
   modified
   Fri Aug 30 13:27:22 2024 Data Channel: using negotiated cipher
   'AES-256-GCM'
   Fri Aug 30 13:27:22 2024 Outgoing Data Channel: Cipher
   'AES-256-GCM' initialized with 256 bit key
   Fri Aug 30 13:27:22 2024 Incoming Data Channel: Cipher
   'AES-256-GCM' initialized with 256 bit key
   Fri Aug 30 13:27:22 2024 ROUTE_GATEWAY 192.168.145.65/255.255.255.0
   IFACE=enp0s3 HWADDR=08:00:27:28:ca:15
   Fri Aug 30 13:27:22 2024 TUN/TAP device tap0 opened
   Fri Aug 30 13:27:22 2024 TUN/TAP TX queue length set to 100
   Fri Aug 30 13:27:22 2024 /sbin/ip link set dev tap0 up mtu 1500
   Fri Aug 30 13:27:22 2024 /sbin/ip addr add dev tap0 192.168.199.2/24
   broadcast 192.168.199.255
   Fri Aug 30 13:27:22 2024 /sbin/ip route add 192.168.80.0/24
   via 192.168.199.1
   Fri Aug 30 13:27:22 2024 WARNING: this configuration may cache passwords
   in memory -- use the auth-nocache option to prevent this
   Fri Aug 30 13:27:22 2024 Initialization Sequence Completed
Warning
If we close the terminal where we started the connection, the connection will be lost.
We check in several ways that the connection has been successfully established:
From the console, we check that the network interface is configured:
ip -4 a

   tap0: <BROADCAST,MULTICAST,UP,LOWER_UP> mtu 1500 qdisc fq_codel state
   UNKNOWN group default qlen 100
      inet 192.168.199.2/24 brd 192.168.199.255 scope global tap0
         valid_lft forever preferred_lft forever
From the widget:
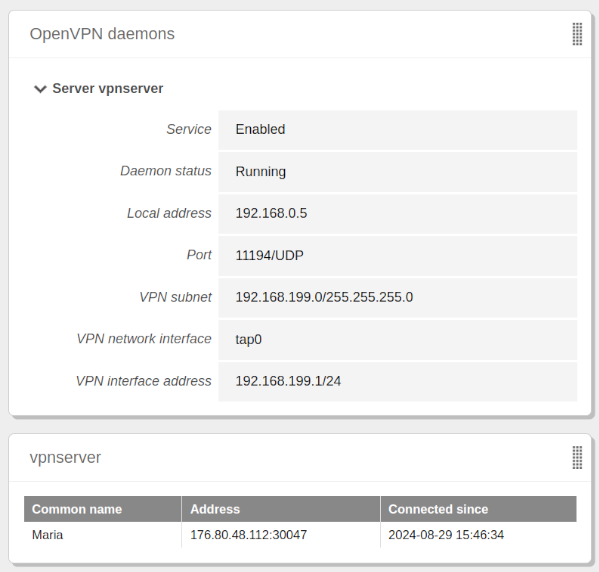
Verification from the Zentyal widget
From the Zentyal log
/var/log/openvpn/vpnserver.log:2024-08-29 13:46:34 176.80.48.112:30047 TLS: Initial packet from [AF_INET]176.80.48.112:30047, sid=b6c8eb84 da892ea7 2024-08-29 13:46:34 176.80.48.112:30047 VERIFY OK: depth=1, C=US, ST=New York, L=New York, O=Zentyal, CN=Zentyal Authority Certificate 2024-08-29 13:46:34 176.80.48.112:30047 VERIFY OK: depth=0, C=US, ST=New York, L=New York, O=Zentyal, CN=Maria 2024-08-29 13:46:34 176.80.48.112:30047 peer info: IV_VER=2.4.12 2024-08-29 13:46:34 176.80.48.112:30047 peer info: IV_PLAT=linux 2024-08-29 13:46:34 176.80.48.112:30047 peer info: IV_PROTO=2 2024-08-29 13:46:34 176.80.48.112:30047 peer info: IV_NCP=2 2024-08-29 13:46:34 176.80.48.112:30047 peer info: IV_CIPHERS=AES-256-GCM:AES-128-GCM:AES-256-CBC 2024-08-29 13:46:34 176.80.48.112:30047 peer info: IV_LZ4=1 2024-08-29 13:46:34 176.80.48.112:30047 peer info: IV_LZ4v2=1 2024-08-29 13:46:34 176.80.48.112:30047 peer info: IV_LZO=1 2024-08-29 13:46:34 176.80.48.112:30047 peer info: IV_COMP_STUB=1 2024-08-29 13:46:34 176.80.48.112:30047 peer info: IV_COMP_STUBv2=1 2024-08-29 13:46:34 176.80.48.112:30047 peer info: IV_TCPNL=1 2024-08-29 13:46:34 176.80.48.112:30047 Control Channel: TLSv1.3, cipher TLSv1.3 TLS_AES_256_GCM_SHA384, peer certificate: 4096 bit RSA, signature: RSA-SHA256 2024-08-29 13:46:34 176.80.48.112:30047 [Maria] Peer Connection Initiated with [AF_INET]176.80.48.112:30047 2024-08-29 13:46:34 Maria/176.80.48.112:30047 MULTI_sva: pool returned IPv4=192.168.199.2, IPv6=(Not enabled) 2024-08-29 13:46:34 Maria/176.80.48.112:30047 Data Channel: using negotiated cipher 'AES-256-GCM' 2024-08-29 13:46:34 Maria/176.80.48.112:30047 Outgoing Data Channel: Cipher 'AES-256-GCM' initialized with 256 bit key 2024-08-29 13:46:34 Maria/176.80.48.112:30047 Incoming Data Channel: Cipher 'AES-256-GCM' initialized with 256 bit key 2024-08-29 13:46:35 Maria/176.80.48.112:30047 PUSH: Received control message: 'PUSH_REQUEST' 2024-08-29 13:46:35 Maria/176.80.48.112:30047 SENT CONTROL [Maria]: 'PUSH_REPLY,route 192.168.80.0 255.255.255.0,route-gateway 192.168.199.1,ping 10,ping-restart 120, ifconfig 192.168.199.2 255.255.255.0,peer-id 0,cipher AES-256-GCM' (status=1) 2024-08-29 13:46:35 Maria/176.80.48.112:30047 MULTI: Learn: f2:c5:27:c4:d0:3c@0 -> Maria/176.80.48.112:30047
Finally, we access the personal folder of the domain user maria and the shared resource accounting at the internal IP 192.168.80.10 of the Zentyal server that has published the VPN connection.
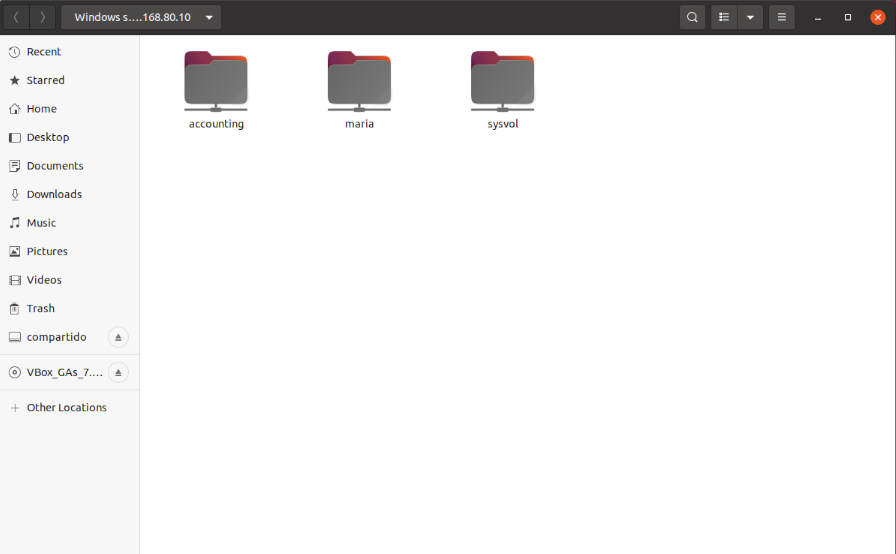
Access to the shared resources of the Zentyal server