Appendix D: Workarounds for Windows 11
The main goal of this document is to provide a workaround so Windows 11 machines can join to a Zentyal 7.0 domain controller. At this moment it is not possible due to the current bug reported in Samba, which can be found here [1].
Warning
Finally, Samba has fixed the bug in the current version as this [2] link indicates. So, it is no longer necessary to use the below workarounds, just keep your Zentyal server up-to-date.
There are two available workarounds, the choice must be done by the system administrator who manages the server. The workarounds are:
- Upgrade Samba to 4.16 from a third-party repository.
- Configure an additional server Ubuntu Server 22.10 as an additional domain controller.
| [1] | Samba bug: https://bugzilla.samba.org/show_bug.cgi?id=15197 |
| [2] | Fix de Samba: https://bugs.launchpad.net/ubuntu/+source/samba/+bug/1993934 |
Workaround 1 - Upgrade Samba
This option upgrades Samba from 4.13.16 to 4.16.6 from a third-party repository. More information about this workaround is here [3].
| [3] | Workaround information: https://lists.samba.org/archive/samba/2022-October/242377.html |
Considerations
Below you have some considerations you must be aware of before choosing this option.
- The repository is not ours, so we do not have any control over it with the risks it implies.
- We did several tests on the domain controller module and all modules that depend on it to confirm the workaround stability, however, we cannot warranty 100% of the module stability and its dependencies.
Recommendations
Before implementing this workaround, there are a few high recommendations:
- The servers’ packages must be up-to-date.
- The server must be stable.
- If you have a testing environment, implement and test it there first.
- Do a backup of the server before implementing the workaround such as a snapshot in case the server is virtualized.
- Do several tests to confirm the stability of the domain after the workaround implementation.
Upgrade of Samba
Below are the actions we must do to implement this workaround.
Download the repository GPG key:
sudo gpg --keyserver keyring.debian.org --recv-key 6EE195D1886E8FFB810D4324457CE0A0804465C5
sudo gpg --export 6EE195D1886E8FFB810D4324457CE0A0804465C5 | sudo tee /etc/apt/trusted.gpg.d/samba-mjt.key
Create the repository configuration file
/etc/apt/sources.list.d/samba.listwith the following content:## Third party repository ## http://www.corpit.ru/mjt/packages/samba ## https://lists.samba.org/archive/samba/2022-October/242377.html deb [signed-by=/etc/apt/trusted.gpg.d/samba-mjt.key] http://www.corpit.ru/mjt/packages/samba ubuntu-20.04-focal/samba-4.16/ deb-src [signed-by=/etc/apt/trusted.gpg.d/samba-mjt.key] http://www.corpit.ru/mjt/packages/samba ubuntu-20.04-focal/samba-4.16/
Check that we can get the information of the new repository:
sudo apt update
Increase the priority of the new repository, to do it, create a configuration file
/etc/apt/preferences.d/samba-repositoryand add the following content:Package: * Pin: release o=mjt Pin-Priority: 900
Check if the new version of Samba is available:
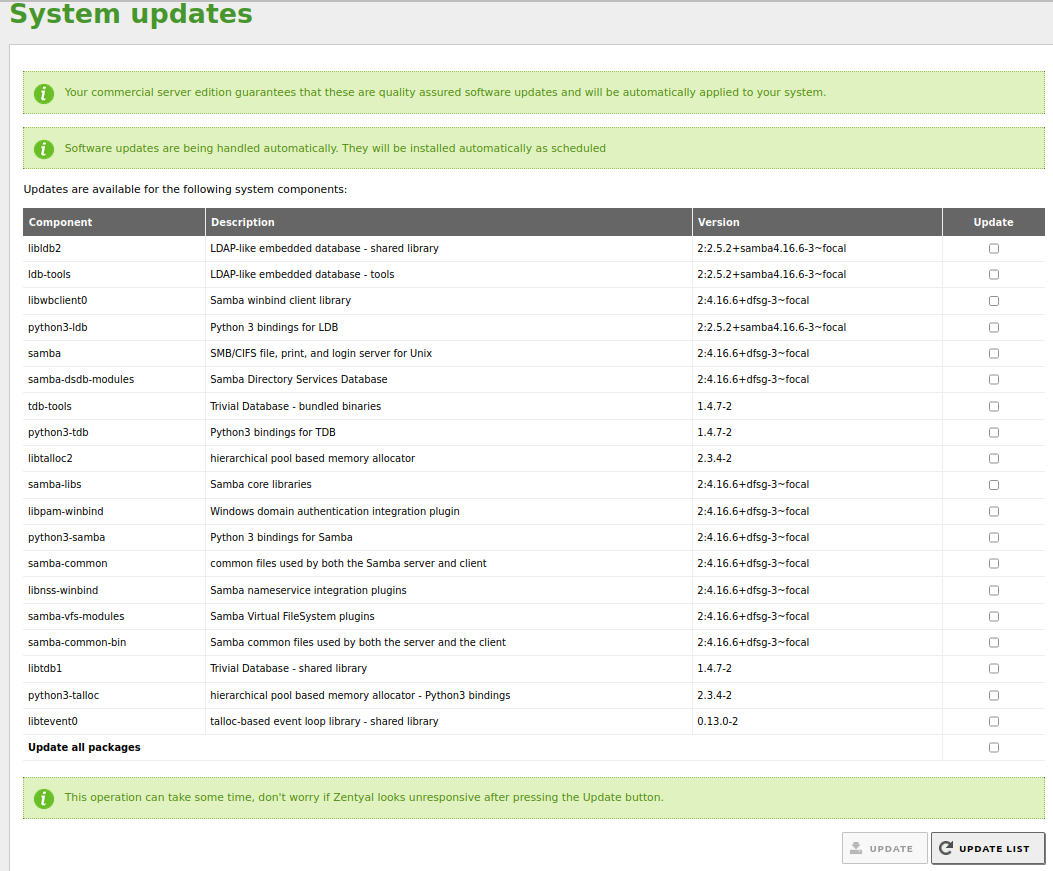
sudo apt policy samba

   ## Example of its output
   samba:
      Instalados: 2:4.13.17~dfsg-0ubuntu1.20.04.1
      Candidato:  2:4.16.6+dfsg-3~focal
      Tabla de versión:
         2:4.16.6+dfsg-3~focal 900
            900 http://www.corpit.ru/mjt/packages/samba ubuntu-20.04-focal/samba-4.16/ Packages
      *** 2:4.13.17~dfsg-0ubuntu1.20.04.1 500
            500 http://es.archive.ubuntu.com/ubuntu focal-updates/main amd64 Packages
            500 http://security.ubuntu.com/ubuntu focal-security/main amd64 Packages
            100 /var/lib/dpkg/status
         2:4.11.6+dfsg-0ubuntu1 500
            500 http://es.archive.ubuntu.com/ubuntu focal/main amd64 Packages
From the Zentyal administration interface, go to Software management -> System updates, update the list of packages, and update them.
Upgrade of Samba packages
Remove the parameter –debug-stderr from the configuration file
/usr/share/perl5/EBox/LDAP.pm:sudo sed -i 's#--debug-stderr##g' /usr/share/perl5/EBox/Ldap.pm
Restart the domain controller module:
sudo zs samba restart
Once Samba is updated, check that all the modules are up and running and also, the following logs do not have any errors:
/var/log/zentyal/zentyal.log/var/log/syslog
Do several tests to confirm the stability of the domain controller module.
Finally, try to join a Windows 11 computer to the domain controller so we can confirm the bug is fixed.
Workaround 2 - Additional domain controller
This option requires installing an additional server Ubuntu Server 22.10, configuring it as an additional domain controller, and finally, configure the network of the Windows 11 computers.
This option is safer than the other, however, it is more complex to implement. Furthermore, it requires a system administrator who has at least, minimum knowledge of Linux servers, especially Ubuntu.
Considerations
Be aware of the following considerations before doing any action:
All the Windows 11 machines must connect only with this Ubuntu 22.10 server, otherwise, the bug will affect them.
The GPOs sync must be configured manually between the domain controllers, here [4] is the workaround available from Samba.
A Windows 11 domain user can access their personal folder or a shared resource, however, it will need to use the FQDN of the Zentyal server, below are two examples:
## Her personal folder
\\zentyal.zentyal-domain.lan\maria

## A shared resource
\\zentyal.zentyal-domain.lan\devops
By default, the domain computers that use Ubuntu as a DNS server will not be able to reach the Internet because the firewall is not configured. This [5] link explains how to solve this behavior.
The ACL option must be enabled in the hard drives. A configuration example for the main disk in the
/etc/fstab:/dev/disk/by-id/dm-uuid-LVM-WN6CO4cWWNIvzQffRXzBcyzSxkwcIiNJi3AaagcZkKMyz0SNwdIisJ65vFdIQFeT / ext4 defaults,usrquota,grpquota,acl 0 1
| [4] | GPO workaround: https://wiki.samba.org/index.php/Rsync_based_SysVol_replication_workaround |
| [5] | Ubuntu as a router: https://kifarunix.com/configure-ubuntu-20-04-as-linux-router/ |
Recommendations
Our recommendations for this setup are:
- Use Zentyal to manage the domain objects such as users, groups, etc.
- Use this Ubuntu server only for Windows 11 machines.
Requirements
Below are the requirements you must fulfill before proceeding with this guide:
- The module Domain Controller must be installed and configured in Zentyal.
- The DNS domain must have the following records for Ubuntu Server:
- A record of type A for the hostname of Ubuntu.
- A record of type A for the IP address of Ubuntu in the domain.
- A record of type NS for the domain that points to the Ubuntu hostname.
Links
Below are the links we followed to make this guide.
- How to configure Samba as an Additional Domain Controller [6]
- Requirements from Samba [7]
- Samba installation [8]
- Additional Samba packages [9]
- Samba main configuration [10]
- DNS installation [11]
- DLZ configuration [12]
- Time service installation [13]
- Special DNS records to verify [14]
- Systemd for Samba [15]
| [6] | How to configure Samba as an Additional Domain Controller: https://wiki.samba.org/index.php/Joining_a_Samba_DC_to_an_Existing_Active_Directory |
| [7] | Requirements from Samba: https://wiki.samba.org/index.php/Setting_up_Samba_as_an_Active_Directory_Domain_Controller#Fresh_Installation |
| [8] | Samba installation: https://wiki.samba.org/index.php/Distribution-specific_Package_Installation#Debian.2FUbuntu |
| [9] | Additional Samba packages: https://github.com/zentyal/zentyal/blob/master/main/samba/debian/control#L16 |
| [10] | Samba main configuration: https://github.com/zentyal/zentyal/blob/master/main/samba/stubs/smb.conf.mas#L21 |
| [11] | DNS installation: https://wiki.samba.org/index.php/Setting_up_a_BIND_DNS_Server#Installing_.26_Configuring_BIND_on_Debian_based_distros |
| [12] | DLZ configuration: https://wiki.samba.org/index.php/BIND9_DLZ_DNS_Back_End |
| [13] | Time service installation: https://wiki.samba.org/index.php/Time_Synchronisation |
| [14] | Special DNS records to verify: https://wiki.samba.org/index.php/Verifying_and_Creating_a_DC_DNS_Record |
| [15] | Systemd for Samba: https://wiki.samba.org/index.php/Managing_the_Samba_AD_DC_Service_Using_Systemd |
Environment
Below is the information that we will use in this document.
- Ubuntu hostname: adc
- Ubuntu IP: 192.168.170.200
- Zentyal hostname: zentyal
- Zentyal IP: 192.168.170.1
- Domain: entyal-domain.lan
- Domain administrator: admindc
- Domain testing user: maria
Configuration of Ubuntu 22.10
Download Ubuntu Server 22.10 ISO from here [16] .
Install Ubuntu Server 22.10.
Set the hostname:
sudo hostnamectl set-hostname adc.zentyal-domain.lan
Modify the configuration file
/etc/hosts:127.0.0.1 localhost 192.168.170.200 adc.zentyal-domain.lan adc # The following lines are desirable for IPv6 capable hosts ::1 ip6-localhost ip6-loopback fe00::0 ip6-localnet ff00::0 ip6-mcastprefix ff02::1 ip6-allnodes ff02::2 ip6-allrouters
Ensure Samba is not installed and also, the Kerberos configuration file does not exist, here [17] we have more details:
sudo dpkg -l | egrep -i samba
sudo rm -f /etc/krb5.conf
Install the required packages for Samba:
sudo apt update
sudo apt install \
  acl \
  attr \
  samba \
  samba-dsdb-modules \
  samba-vfs-modules \
  winbind \
  libpam-winbind \
  libnss-winbind \
  dnsutils \
  ldb-tools \
  libgssapi3-heimdal \
  libsasl2-modules-gssapi-heimdal \
  heimdal-clients
The answers to the questions are:
- Default Kerberos version 5 realm: ZENTYAL-DOMAIN.LAN
- Kerberos servers for your realm: adc.zentyal-domain.lan
- Administrative server for your Kerberos realm: adc
Install Bind9 as a DNS backend service as this [18] link explains:
sudo apt install bind9 bind9utils
Modify the configuration file
/etc/default/namedso the DNS service only listens for IPv4:OPTIONS="-u bind -4"
Modify the Bind9 global configuration located at
/etc/bind/named.conf.options:// Managing acls acl internals { 127.0.0.0/8; 192.168.170.0/24; }; options { directory "/var/cache/bind"; version "Go Away 0.0.7"; notify no; empty-zones-enable no; auth-nxdomain yes; forwarders { 8.8.8.8; 8.8.4.4; }; // If you only use IPv4. listen-on-v6 { none; }; // listen on these ipnumbers. listen-on port 53 { 192.168.170.200; 127.0.0.1; }; // Added Per Debian buster Bind9. // Due to : resolutionr: info: resolutionr priming query complete messages in the logs. // See: https://gitlab.isc.org/isc-projects/bind9/commit/4a827494618e776a78b413d863bc23badd14ea42 minimal-responses yes; // Add any subnets or hosts you want to allow to use this DNS server allow-query { "internals"; }; allow-query-cache { "internals"; }; allow-transfer { none; }; // Add any subnets or hosts you want to allow to use recursive queries recursion yes; allow-recursion { "internals"; }; // https://wiki.samba.org/index.php/Dns-backend_bind // DNS dynamic updates via Kerberos (optional, but recommended) tkey-gssapi-keytab "/var/lib/samba/bind-dns/dns.keytab"; };Check the configuration file syntax:
sudo named-checkconf
Enable the service and start it:
sudo systemctl enable named
sudo systemctl start named
Do a DNS query to the localhost zone to confirm that the DNS service is working:
## Forward zone
host -t A localhost 127.0.0.1

  ## An example of its output:
  Using domain server:
  Name: 127.0.0.1
  Address: 127.0.0.1#53
  Aliases:

  localhost has address 127.0.0.1

## Reverse zone
host -t PTR 127.0.0.1 127.0.0.1

  ## An example of its output:
  Using domain server:
  Name: 127.0.0.1
  Address: 127.0.0.1#53
  Aliases:

  1.0.0.127.in-addr.arpa domain name pointer localhost.
Add the following code in the configuration file
/etc/bind/named.conf.localat the bottom:// Custom configuration for Samba DC //dlz "AD DNS Zone" { // database "dlopen /usr/lib/x86_64-linux-gnu/samba/bind9/dlz_bind9_18.so"; //};Check the syntax again:
sudo named-checkconf
Modify the content of the configuration file
/etc/krb5.confas follows:[libdefaults] default_realm = ZENTYAL-DOMAIN.LAN dns_lookup_kdc = true dns_lookup_realm = false rdns = no
Verify that we can get a Kerberos ticket:
## Get the ticket
sudo kinit admindc

## List the ticket
sudo klist

  ## An example of its output:
  Credentials cache: FILE:/tmp/krb5cc_0
        Principal: [email protected]

  Issued                Expires               Principal
  Oct 26 10:24:51 2022  Oct 26 20:24:51 2022  krbtgt/[email protected]
Install the NTP time service:
sudo apt install ntp ntpdate
Configure the NTP service by modifying the configuration file
/etc/ntp.conf:# Local clock. Note that is not the "localhost" address! server 127.127.1.0 fudge 127.127.1.0 stratum 10 # Where to retrieve the time from server zentyal.zentyal-domain.lan iburst prefer server adc.zentyal-domain.lan iburst driftfile /var/lib/ntp/ntp.drift logfile /var/log/ntp # Access control # Default restriction: Disallow everything restrict default ignore # No restrictions for "localhost" restrict 127.0.0.1 # Enable the time sources only to only provide time to this host restrict zentyal.zentyal-domain.lan mask 255.255.255.255 nomodify notrap nopeer noquery restrict adc.zentyal-domain.lan mask 255.255.255.255 nomodify notrap nopeer noquery ## NOTE: This parameter is only for virtual machines only tinker panic 0
Restart the NTP service to apply the changes:
sudo systemctl restart ntp
Set the timezone:
sudo timedatectl set-timezone Europe/Madrid
In the main Samba configuration file
/etc/samba/smb.confmodify its content for the following:[global] workgroup = zentyal-domain realm = ZENTYAL-DOMAIN.LAN netbios name = adc server string = Ubuntu 22 server role = dc server role check:inhibit = yes server services = -dns server signing = auto dsdb:schema update allowed = yes ldap server require strong auth = no drs:max object sync = 1200 idmap_ldb:use rfc2307 = yes winbind enum users = yes winbind enum groups = yes template shell = /usr/bin/bash template homedir = /home/%U rpc server dynamic port range = 49152-65535 interfaces = lo,enp0s9 bind interfaces only = yes map to guest = Bad User log level = 3 log file = /var/log/samba/samba.log max log size = 100000 [netlogon] path = /var/lib/samba/sysvol/zentyal-domain.lan/scripts browseable = no read only = yes [sysvol] path = /var/lib/samba/sysvol read only = no
Before joining the server, we must ensure that we can reach Zentyal:
ping zentyal.zentyal-domain.lan
Also, we must ensure that Zentyal’s firewall allows Ubuntu to use the Samba service. Below is an example:
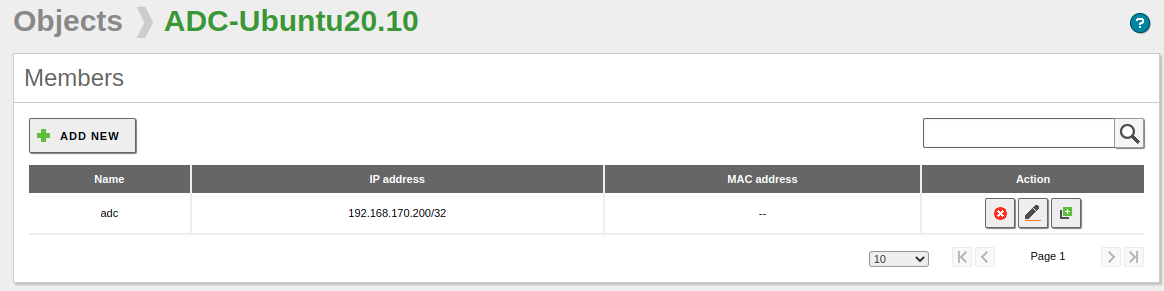
Zentyal object for Ubuntu 22.10

Zentyal firewall for Ubuntu 22.10
Now, we can join the Ubuntu Server 22.10 to the Zentyal domain controller:
sudo samba-tool domain \
        join \
        zentyal-domain.lan \
        DC \
        --username='admindc' \
        --dns-backend=BIND9_DLZ \
        --workgroup='zentyal-domain' \
        --server='192.168.170.1'

## The latest message of the join process in case everything was successful

INFO 2022-10-27 10:59:06,310 pid:1046 /usr/lib/python3/dist-packages/samba/join.py #1544: Joined domain ZENTYAL-DOMAIN (SID S-1-5-21-3507753539-3088741907-912681098) as a DC
Warning
In case of error, read the message carefully.
After joining the Ubuntu Server 22.10, we need to do the following checks explained here [19]
## FQDN
host -t A adc.zentyal-domain.lan

## An example of its output:
adc.zentyal-domain.lan has address 192.168.170.200

## Get the objectGUID
sudo ldbsearch -H /var/lib/samba/private/sam.ldb '(invocationId=*)' --cross-ncs objectguid

## An example of its output:
# record 1
dn: CN=NTDS Settings,CN=ZENTYAL,CN=Servers,CN=Default-First-Site-Name,  CN=Sites,CN=Configuration,DC=zentyal-domain,DC=lan
objectGUID: f57dbf3e-c50c-45ff-8c1b-9bfe1c0c7607

# record 2
dn: CN=NTDS Settings,CN=ADC,CN=Servers,CN=Default-First-Site-Name,CN=Sites, CN=Configuration,DC=zentyal-domain,DC=lan
objectGUID: 1593056e-3ded-469b-bcca-2358da389bb2

# returned 2 records
# 2 entries
# 0 referrals

## Verify each objectGUID
host -t CNAME 1593056e-3ded-469b-bcca-2358da389bb2._msdcs.zentyal-domain.lan

## An example of its output:
1593056e-3ded-469b-bcca-2358da389bb2._msdcs.zentyal-domain.lan is an alias for ADC.zentyal-domain.lan.

host -t CNAME f57dbf3e-c50c-45ff-8c1b-9bfe1c0c7607._msdcs.zentyal-domain.lan

## An example of its output:
f57dbf3e-c50c-45ff-8c1b-9bfe1c0c7607._msdcs.zentyal-domain.lan is an alias for zentyal.zentyal-domain.lan.
Warning
The subdomain _msdcs is required in the objectGUID verification.
Uncomment in the configuration file
/etc/bind/named.conf.localthe following lines:// Custom configuration for Samba DC dlz "AD DNS Zone" { database "dlopen /usr/lib/x86_64-linux-gnu/samba/bind9/dlz_bind9_18.so"; };Restart the DNS service:
sudo systemctl restart named
sudo systemctl status named
Once the DNS service is up and running, we need to disable certain Samba services and active the correct ones:
sudo systemctl stop smbd nmbd winbind
sudo systemctl mask smbd nmbd winbind
sudo systemctl disable smbd nmbd winbind

sudo systemctl unmask samba-ad-dc
sudo systemctl start samba-ad-dc
sudo systemctl status samba-ad-dc
Finally, it is recommended to do some replications checks in order to confirm the stability of the new additional domain controller:
Get the domain users and groups:
sudo samba-tool user list
sudo samba-tool group list
Get the replication status as this [20] explains:
sudo samba-tool drs showrepl

   ## An example of its output:
   ==== INBOUND NEIGHBORS ====

   DC=DomainDnsZones,DC=zentyal-domain,DC=lan
   Default-First-Site-Name\ZENTYAL via RPC
      DSA object GUID: f57dbf3e-c50c-45ff-8c1b-9bfe1c0c7607
      Last attempt @ Thu Oct 27 11:07:35 2022 CEST was successful
      0 consecutive failure(s).
      Last success @ Thu Oct 27 11:07:35 2022 CEST

   CN=Schema,CN=Configuration,DC=zentyal-domain,DC=lan
   Default-First-Site-Name\ZENTYAL via RPC
      DSA object GUID: f57dbf3e-c50c-45ff-8c1b-9bfe1c0c7607
      Last attempt @ Thu Oct 27 11:07:35 2022 CEST was successful
      0 consecutive failure(s).
      Last success @ Thu Oct 27 11:07:35 2022 CEST

   DC=zentyal-domain,DC=lan
   Default-First-Site-Name\ZENTYAL via RPC
      DSA object GUID: f57dbf3e-c50c-45ff-8c1b-9bfe1c0c7607
      Last attempt @ Thu Oct 27 11:07:35 2022 CEST was successful
      0 consecutive failure(s).
      Last success @ Thu Oct 27 11:07:35 2022 CEST

   CN=Configuration,DC=zentyal-domain,DC=lan
   Default-First-Site-Name\ZENTYAL via RPC
      DSA object GUID: f57dbf3e-c50c-45ff-8c1b-9bfe1c0c7607
      Last attempt @ Thu Oct 27 11:07:35 2022 CEST was successful
      0 consecutive failure(s).
      Last success @ Thu Oct 27 11:07:35 2022 CEST

   DC=ForestDnsZones,DC=zentyal-domain,DC=lan
   Default-First-Site-Name\ZENTYAL via RPC
      DSA object GUID: f57dbf3e-c50c-45ff-8c1b-9bfe1c0c7607
      Last attempt @ Thu Oct 27 11:07:35 2022 CEST was successful
      0 consecutive failure(s).
      Last success @ Thu Oct 27 11:07:35 2022 CEST

   ==== OUTBOUND NEIGHBORS ====

   CN=Schema,CN=Configuration,DC=zentyal-domain,DC=lan
   Default-First-Site-Name\ZENTYAL via RPC
      DSA object GUID: f57dbf3e-c50c-45ff-8c1b-9bfe1c0c7607
      Last attempt @ NTTIME(0) was successful
      0 consecutive failure(s).
      Last success @ NTTIME(0)

   DC=zentyal-domain,DC=lan
   Default-First-Site-Name\ZENTYAL via RPC
      DSA object GUID: f57dbf3e-c50c-45ff-8c1b-9bfe1c0c7607
      Last attempt @ NTTIME(0) was successful
      0 consecutive failure(s).
      Last success @ NTTIME(0)

   CN=Configuration,DC=zentyal-domain,DC=lan
   Default-First-Site-Name\ZENTYAL via RPC
      DSA object GUID: f57dbf3e-c50c-45ff-8c1b-9bfe1c0c7607
      Last attempt @ NTTIME(0) was successful
      0 consecutive failure(s).
      Last success @ NTTIME(0)

   DC=ForestDnsZones,DC=zentyal-domain,DC=lan
   Default-First-Site-Name\ZENTYAL via RPC
      DSA object GUID: f57dbf3e-c50c-45ff-8c1b-9bfe1c0c7607
      Last attempt @ Thu Oct 27 11:07:25 2022 CEST was successful
      0 consecutive failure(s).
      Last success @ Thu Oct 27 11:07:25 2022 CEST

   ==== KCC CONNECTION OBJECTS ====

   Connection --
   Connection name: 79849241-81e9-4e1b-bad3-741533dcd6f1
   Enabled        : TRUE
   Server DNS name : zentyal.zentyal-domain.lan
   Server DN name  : CN=NTDS Settings,CN=ZENTYAL,CN=Servers,CN=Default-First-Site-Name,CN=Sites,CN=Configuration,DC=zentyal-domain,DC=lan
      TransportType: RPC
      options: 0x00000001
   Warning: No NC replicated for Connection!
Create a test object such as a domain user in Zentyal and wait a minute to see if it was replicated. Below is an example of the crucial records of the log file
/var/log/samba/samba.logrelated to the sync from Zentyal:## Log file: /var/log/samba/samba.log [2022/10/27 11:12:44.473403, 3] ../../source4/dsdb/repl/drepl_service.c:207(_drepl_schedule_replication) _drepl_schedule_replication: forcing sync of partition (063be8a2-398b-498d-99d9-112be2bace60, DC=zentyal-domain,DC=lan, f57dbf3e-c50c-45ff-8c1b-9bfe1c0c7607._msdcs.zentyal-domain.lan) [2022/10/27 11:12:44.527349, 2] ../../source4/dsdb/repl/replicated_objects.c:1058(dsdb_replicated_objects_commit) Replicated 1 objects (0 linked attributes) for DC=zentyal-domain,DC=lanEnsure that in the log file
/var/log/syslogthere are no errors related to Samba or DNS service on both servers.
| [16] | ISO Ubuntu Server 22.10: https://releases.ubuntu.com/22.10/ubuntu-22.10-live-server-amd64.iso |
| [17] | Samba requirements: https://wiki.samba.org/index.php/Setting_up_Samba_as_an_Active_Directory_Domain_Controller#Only_Applicable_if_Samba_was_Previously_Installed |
| [18] | DNS configuration: https://wiki.samba.org/index.php/Setting_up_a_BIND_DNS_Server#Installing_.26_Configuring_BIND_on_Debian_based_distros |
| [19] | Verification of the critical DNS records: https://wiki.samba.org/index.php/Verifying_and_Creating_a_DC_DNS_Record |
| [20] | Replication statuses: https://wiki.samba.org/index.php/Verifying_the_Directory_Replication_Statuses |
Configuration of Windows 11
This section is going to show an example of how to join a Windows 11 computer to the domain and how to access any shared.
- The first and most important action to do is to configure the network.
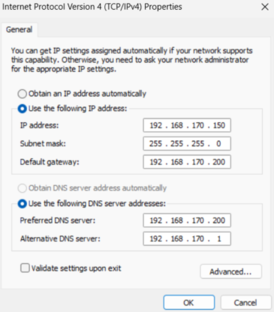
Windows 11 network configuration
Warning
Remember that the DNS server must be Ubuntu 22.10, so it can get Kerberos’ ticket, otherwise, it will fail because the Samba installed in Zentyal cannot provide that ticket due to the current bug.
- Then, we must ensure that the domain can be resolutiond through Ubuntu.
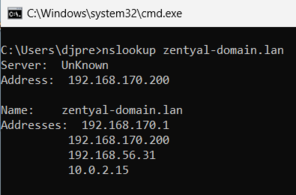
Windows 11 domain resolution
- After that, we can join the computer to the domain.
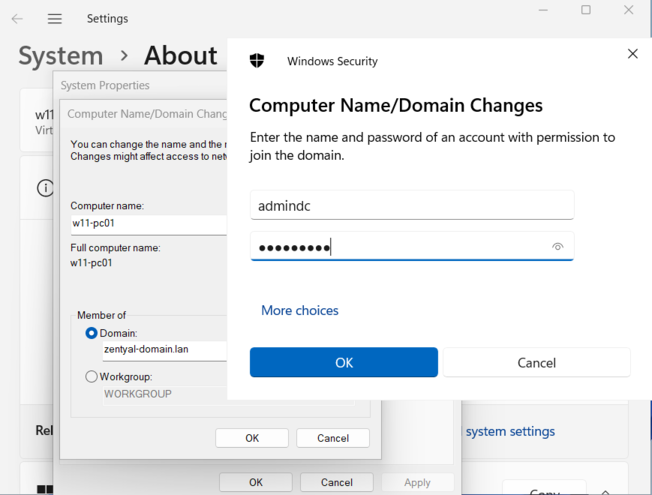
Windows 11 domain join
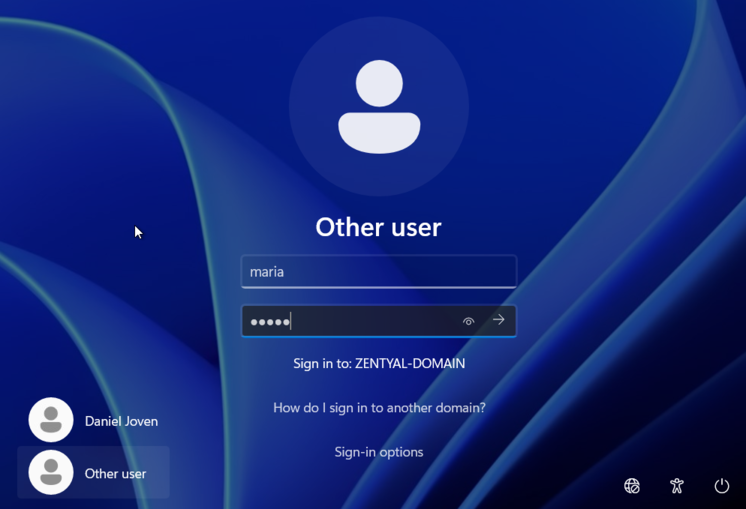
- Once the computer is joined to the domain, we will be able to log in with a domain user, just remember that the main DNS server must be Ubuntu.
Windows 11 login
- In case we want to access any shared folder such as the personal folder or some shared resource, we will need to use the Zentyal FQDN. Below is an example:
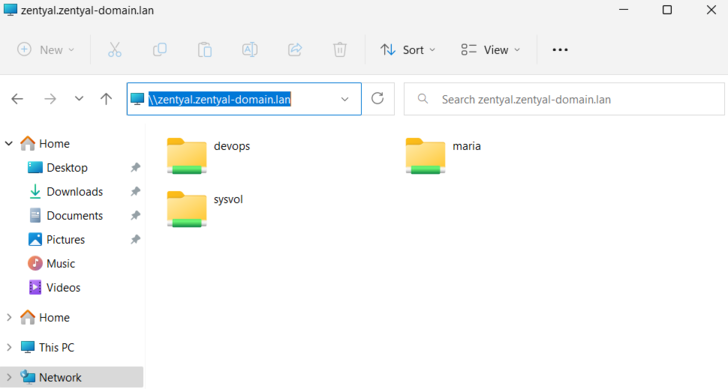
Windows 11 shares
Troubleshooting
Below are the links that will help us in case of an issue during any of the above steps:
| [21] | Main troubleshooting article: https://wiki.samba.org/index.php/Samba_AD_DC_Troubleshooting |
| [22] | DNS: https://wiki.samba.org/index.php/Linux_and_Unix_DNS_Configuration |
| [23] | DNS DLZ: https://wiki.samba.org/index.php/BIND9_DLZ_DNS_Back_End#Troubleshooting |
| [24] | ObejectGUID objects: https://wiki.samba.org/index.php/Verifying_and_Creating_a_DC_DNS_Record |