Directory Service (LDAP)
Introduction to Directory Service (LDAP)
Zentyal integrates OpenLDAP [3] as a directory service, with Samba [4] to implement the domain controller functionality of Windows and also file and printer sharing.
| [3] | http://www.openldap.org/ |
| [4] | http://en.wikipedia.org/wiki/Samba_(software) |
Configuring Zentyal servers in master/slave mode
As mentioned earlier, Zentyal is designed in a modular way, allowing the system administrator to distribute the services between several hosts in the network. To make it real, the users and groups module can be configured using a master/slave architecture in order to share users between the different servers.
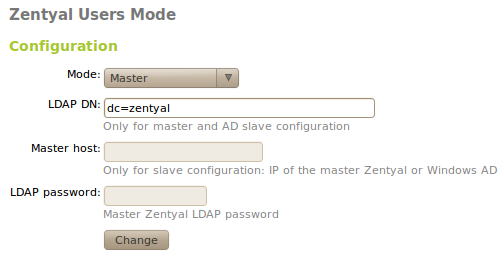
Go to the menu Users and Groups ‣ Mode, the module will act as a master LDAP directory and the Distinguished Name (DN) [7] of the directory will be established using the host name. If you want to configure a different DN, you can change this on the text field LDAP DN.
| [7] | Every entry on a LDAP directory has a unique identifier called Distinguished Name which has some similarities with the concept of a complete path on a file system. |
Zentyal users mode
Other servers can be configured to use a master as a source for their users and they become slave servers. To do this, choose slave mode in Users and Groups ‣ Mode. The slave configuration needs two more fields, the IP address or name of the host containing the master directory and its LDAP password. This password is not the Zentyal password, but one automatically generated when you enable the users and groups module. You can obtain this password in the field Password using the Users and group ‣ LDAP data option in the master server.
LDAP info
There is another requirement to register a slave server against a master. The master needs to be able to resolve the name of the slave machines using DNS. To do this, you need to configure the DNS service in Zentyal, adding a new domain with the slave host name and the IP address.
If the firewall module is enabled in the master server, it must be configured in a way that it will allow the incoming traffic from the slaves. By default, the firewall forbids this traffic, so it is necessary to make the required adjustments before continuing.
Once all the parameters have been established and the host name of the slave can be resolved from the master, the slave can be registered in the master Zentyal server enabling the module users and groups in Module status.
The slaves will create a copy of the master directory when they register for the first time, and it will be automatically maintained when new users and groups are added. You can see the slave list in the Users and groups ‣ Slave status menu in the master Zentyal machine.

Slave status
The modules which have users like mail and filesharing can now be installed in the slaves and they will use the users configured in the master Zentyal directory. Some modules need extra actions to be executed when you add users, for instance filesharing, which needs to create the user directories. To do so, the master will notify the slaves about the new users and groups when they are created , providing the opportunity for the slaves to perform the associated actions.
There can be some problems running these actions in some circumstances, for example if one of the slaves is powered down. In this case, the master will remember that there are remaining actions that must be performed and will periodically retry. The system administrator can also check the slaves status on the menu Users and groups ‣ Slave status and then force the retry of the actions manually at any time. From this section it is also possible to remove a slave.
There is an important limitation of the master/slave architecture. The master Zentyal server can not have modules which depend of users and groups, for example filesharing and mail. If the master has any of these modules installed, they must be un-installed before trying to register any slave.
Configuring Zentyal as a slave of Windows Active Directory
Apart from the master-slave configuration that can be set-up between different Zentyal hosts, a Zentyal server can be used in the role of slave like a Windows Active Directory host, acting as master.
The replication can be performed only in one direction, from Windows to Zentyal, and there are two separate processes for data and for passwords. All the user data from users and groups will be synchronised through the LDAP protocol. Nevertheless, the passwords can be transferred through a cyphered TCP communication, with the server listening in the Zentyal host and the client notifying the passwords when a new user is created or the password in the master Windows server is modified.
To deploy a scenario with this feature, you will need a working Zentyal server with an advanced configuration of the users directory and a Windows server with Active Directory configured. In the Windows server, you need to install the software that will perform the slave synchronisation and for the slave machines, you will need to register the master server.
Configuring the Windows server as a master
You need to install a special software package in the Active Directory server in order to notify the password changes to Zentyal.
These packages can be downloaded, for the different versions of Zentyal from the download page of the project [8]
| [8] | http://sourceforge.net/projects/zentyal/files/ |
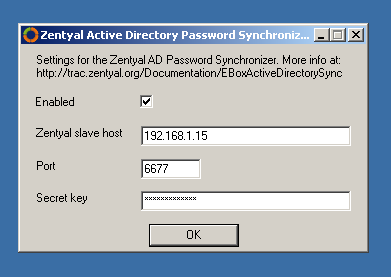
Once downloaded and executed, it will launch the configuration tool automatically and you can enter the following data:
- Zentyal slave host:
- IP Address of the Zentyal host.
- Port:
- You can use the default value or change it to a different one which is available of the Zentyal host.
- Secret key:
- You can choose any password, as long as its length is at least 16 characters
- Enable service:
- Check this box if you want to write the data in the Windows registry. It will not have effect until the server is restarted.
Configuration dialogue during installation
The values for port and secret key have to be entered after the Zentyal host configuration, as explained in the following section.
To finish the installation, click on the button Save to Registry and Exit. It is not recommended to restart the server yet, as there are some configuration steps remaining.
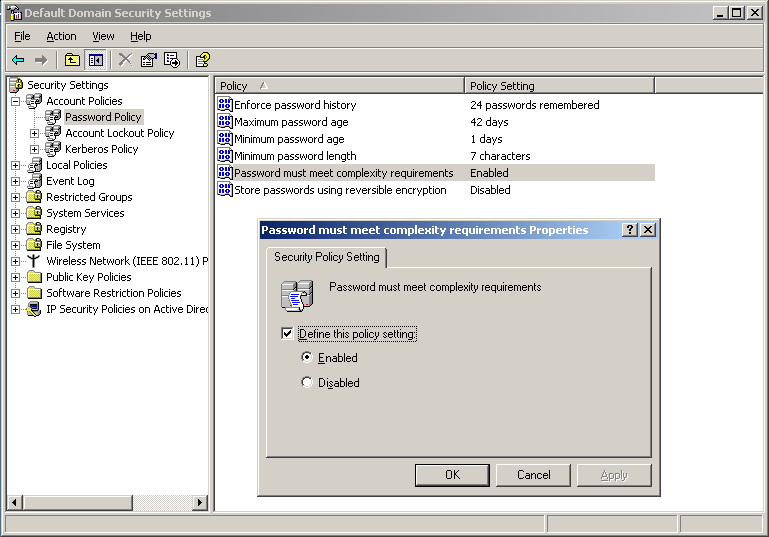
In the Start menu, go to Administrative Tools ‣ Domain security policy and activate the complexity requirements for a password as shown in the figure:
Editing password policy.
Now add a user and then assign a password. You have to take into account that these credentials will be used to connect via LDAP, thus, the relevant part is the complete name (CN) and not the user name. The recommendation for avoiding any conflict is to leave fields for name and surname blank then assign the same value to the Complete Name and the Session startup name.
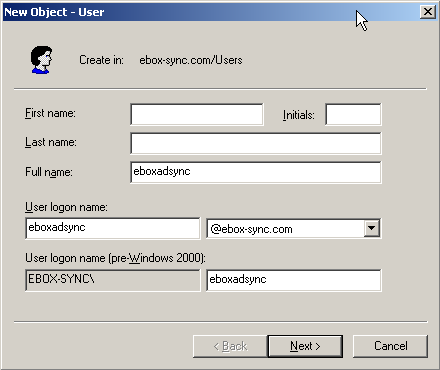
Adding the new user eboxadsync
Once you have finished this configuration the hosts can be restarted as described by the installer.
Configuring the Zentyal server as slave
Once the Windows server is ready, you can proceed to configure Zentyal from Users and groups ‣ Mode. Here, you must enter the following data:
- Mode:
- Choose the Windows AD slave option.
- Master host:
- IP address of the Windows server.
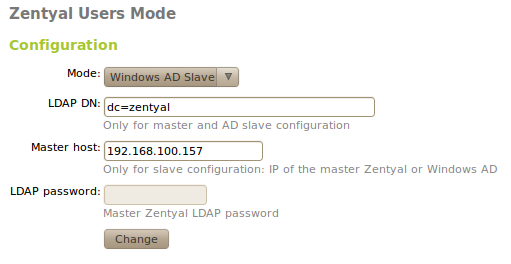
User mode in Zentyal
Once you have entered these values, you can activate the Users and groups module and save the changes. When Zentyal is prepared to work in this mode, the authentication information can be inserted from the Windows server from Users and groups ‣ Windows AD synchronisation.
- AD User:
- Name of the user that you have created in the Windows host.
- AD Password:
- The password of the user.
- Reception port:
- Port entered during the Windows server configuration.
- AD Secret key:
- The 16 character key used during the configuration in the Windows host.
Warning
The passwords assigned to existing users must be reassigned again (or changed) and the Zentyal server notified. Once the users are synchronised, these updates can take up to 5 minutes to complete.
Configuration of an LDAP server with Zentyal
LDAP configuration options
After configuring the Zentyal server as master, from Users and Groups ‣ LDAP Configuration Options you can check the current LDAP configuration and perform some adjustments related to the configuration of PAM authentication on the system.
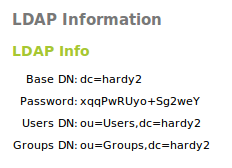
In the upper part, you can see the LDAP Information:

LDAP configuration in Zentyal
- Base DN:
- Base of the domain names in this server.
- Root DN:
- Domain name of the server root.
- Password:
- The password of other services and applications that want to use this LDAP server. If you want to configure a Zentyal server as a slave of this server, this is the password that will be used.
- Users DN:
- Domain name of the users’ directory.
- Groups DN:
- Domain name of the groups’ directory.
In the lower part you can establish some PAM settings
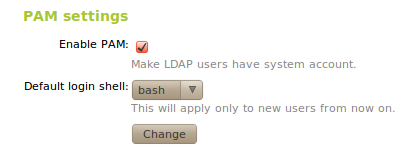
PAM Settings in Zentyal.
Enabling PAM, you will allow the users managed by Zentyal to also act as normal system users, rendering it possible to start sessions in the server.
You also specify in this section the default command interpreter for your users. This option is initially configured as nologin, blocking the users from starting sessions. Changing this options will not modify the existing users in the system, and will only be applied to the users created after the change.
Creating users and groups
You can create a group from the Users and groups ‣ Groups menu. A group will be identified by its name, and can also contain a description.
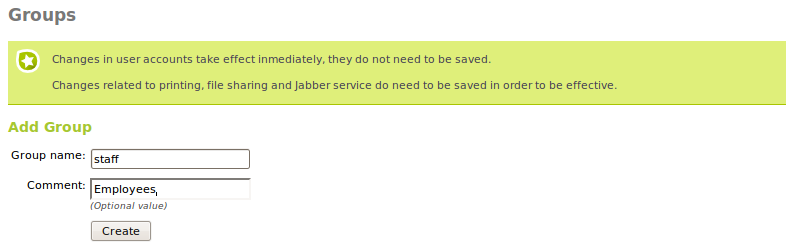
Adding a group to Zentyal
Going to Users and groups ‣ Groups you can see all the existing groups, edit or delete them.
While you are editing a group, you can choose the users that belong to the group, and also the information associated with the modules in Zentyal that have some specific configuration associated with user groups.
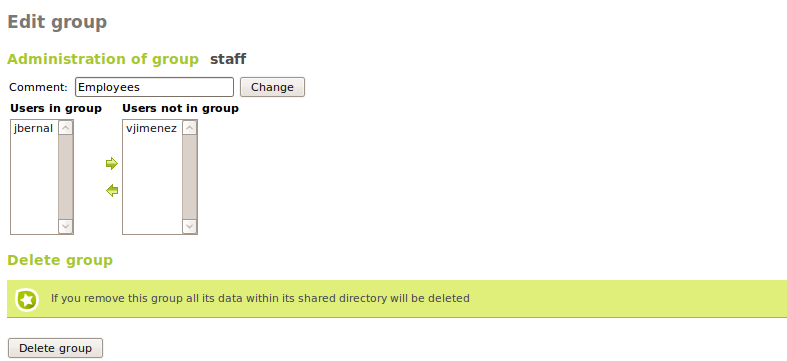
Editing a group
Among other things, with users groups is possible to:
- Have a directory shared between the members of the group.
- Set permissions to a printer for all the users of a group.
- Create an alias for a mail address that will forward to all the users of a group.
- Assign access permissions of different groupware applications to the users of a group.
The users created from the Users and Groups‣ Users menu, is where you need to add the following information:
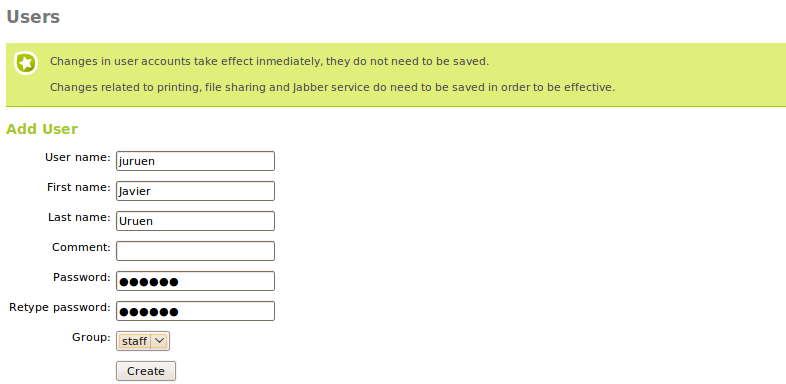
Adding a user to Zentyal
- User name:
- Name of the user on the system, it will be the name used in the authentication processes.
- Name:
- Name of the user.
- Surname:
- Surname of the user.
- Comment:
- Additional information about the user.
- Password:
- Password that will be used in the authentication processes. This information will have to be typed twice to avoid typing errors.
- Group:
- Is possible to add the user to a group during the creation process.
From Users and Groups ‣ Users you can obtain a list of the users, edit or delete them.
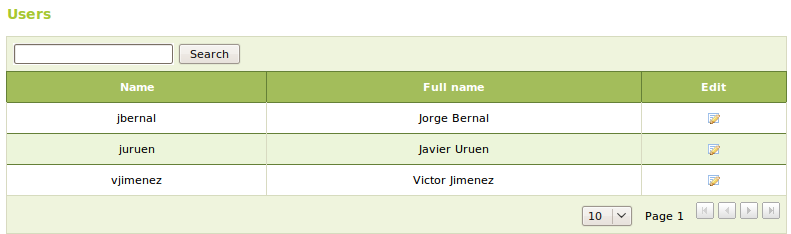
List of users in Zentyal
While editing a user, you can change all the details, except the user name and the information that is associated with the installed Zentyal modules. These contain some specific configuration details assigned to users. You can also modify the list of groups that contain this user.
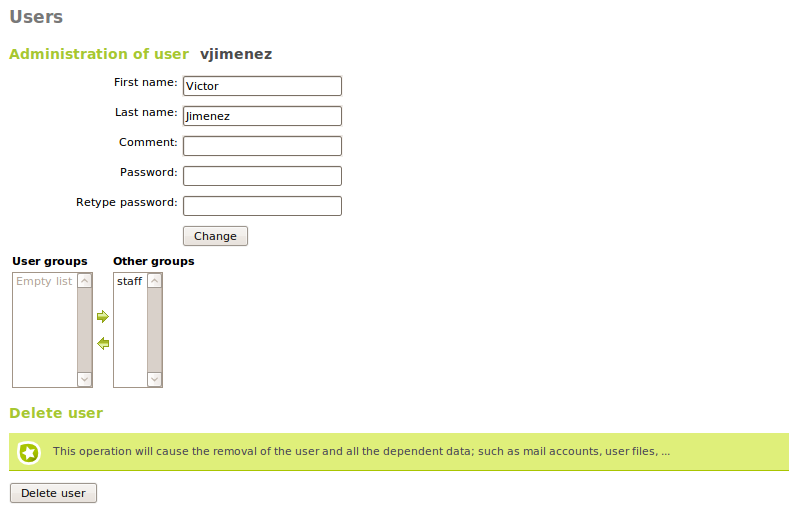
Editing a user
When editing a user you can:
- Create an account for the jabber server.
- Create an account for the filesharing or PDC with a personalised quota.
- Grant permissions to the user to use a printer.
- Create an e-mail account for the user and alias for it.
- Assign a telephone extension for the user.
- Enable or disable the user account for Zarafa and check if it has administrator rights.
In a master/slave configuration, the basic user and groups fields can be edited in the master, while the rest of attributes related with other installed modules in the slave will be edited from the slave.
User’s corner
The user’s data can only be modified by the Zentyal administrator, which can be inefficient when the number of users to be managed becomes too big. Administration tasks like changing the password of a user can be very time consuming. For this reason, you need the User’s corner. This corner is a Zentyal service designed to allow the users to change their own data. This functionality has to be enabled like the rest of the modules. The user’s corner is listening on another port different to other processes to enhance the system security.
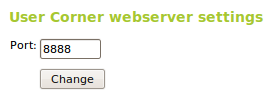
Configure user’s corner port
The user can access the User corner using the URL:
https://<Zentyal_ip>:<usercorner_port>/
Once the user enters his/her name and password, he/she can perform changes in his personal configuration. User’s corner offers the following functionality:
- Change the current password.
- Configure the voice mail for the user.
- Configure an external personal account to retrieve the mail and synchronise it with the content of the mail server in Zentyal.
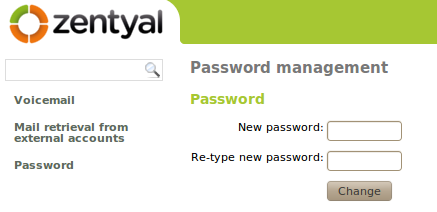
Change the current password in user’s corner