Appendix C: LVM
Next a series of very useful tools when creating virtualized scenarios are presented; from hard disk management to building and managing virtual machines.
LVM
LVM (Logical Volume Manager) [1] is a feature the Linux kernel uses to virtualize the management of the storage devices. Using it, you can add and remove disks from groups, create logical volumes inside a group, then change their size dynamically without taking the filesystem off-line.
| [1] | http://sources.redhat.com/lvm/ |
Most of the Linux distributions include LVM support in the kernel by default, so normally, all you need to do in order to use it is to install the lvm2 package.
To configure LVM; first, format the disks with the specific Linux LVM (8E) partition type. Over these partitions (which may span the whole disk or not) create one or more groups. A group can span various physical disks (partitions). You can create one or more logic volumes inside of each group.
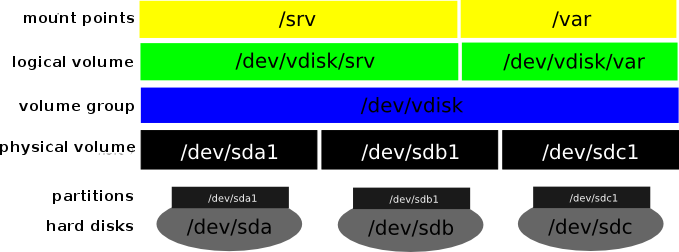
LVM configuration example
In this example you have a group vdisk spanning three physical disks sda1, sdb1 and sdc1. This group has two volumes: srv and var.
You can use LVM even if there is only a single hard disk in your system. This provides the ability to dynamically change the size of the partitions where data is stored. If new physical disks are installed the size of the file system can also be dynamically expanded.
A typical LVM configuration will contain the system in a small partition (around 4GB) ext3 at the beginning of the disk, and the remaining space is used for a physical LVM volume.
Then you can create a group that will contain logical volumes for the mount points where it is expected that data content will vary in size, like /var, /srv or /home.
Practical examples
Practical example A
LVM Configuration:
user@host:~$ sudo aptitude update

user@host:~$ sudo aptitude install lvm2 xfsprogs

user@host:~$ sudo cfdisk /dev/sda
- Go to Free Space ‣ New ‣ Primary and press enter.
- Then go to Type, press enter and enter 8E.
- Next, select Write and press yes.
- Finally, exit the program with Quit.
Reboot the system in order to reload the partition table, this can also be achieved by using the tool kpartx:
user@host:~$ sudo pvcreate /dev/sda4

user@host:~$ sudo pvdisplay

user@host:~$ sudo pvdisplay -C

user@host:~$ sudo vgcreate vdisk /dev/sda4

user@host:~$ sudo vgdisplay

user@host:~$ sudo vgdisplay -C

user@host:~$ sudo lvcreate vdisk --name home --size 3G

user@host:~$ sudo lvcreate vdisk --name srv --size 1.7G

user@host:~$ sudo lvdisplay

user@host:~$ sudo lvdisplay -C

user@host:~$ sudo lvremove vdisk/srv

user@host:~$ sudo lvdisplay -C

user@host:~$ sudo lvcreate vdisk --name srv --size 1G

user@host:~$ sudo mkfs.xfs /dev/vdisk/srv ; sudo mkfs.xfs /dev/vdisk/home

user@host:~$ sudo mount -t xfs /dev/vdisk/srv /srv

user@host:~$ df -h

user@host:~$ sudo lvextend /dev/vdisk/srv -L+0.7G

user@host:~$ sudo xfs_growfs /srv

user@host:~$ df -h

add the following in /etc/fstab:

/dev/mapper/vdisk-srv  /srv     xfs     noatime         0       2
/dev/mapper/vdisk-home /home    xfs     noatime         0       2

user@host:~$ sudo mount -a
For more information about LVM you can go to http://www.howtoforge.com/linux_lvm
Practical example B
Create a virtual machine with vmbuilder:
user@host:~$ sudo aptitude install ubuntu-vm-builder

user@host:~$ sudo vmbuilder kvm ubuntu --suite hardy --arch i386

user@host:~$ cd ubuntu-kvm ; \
             qemu-img convert -f qcow2 disk0.qcow2 -O raw disk0.raw

user@host:~/ubuntu-kvm$ vboxmanage convertdd disk0.raw disk0.vdi