Appendix B: Advanced network scenarios
Let’s see how to deploy network scenarios somewhat more complex than just a virtual machine with Internet access through Bridged Adaptor mode.
Scenario 1: Virtualized Zentyal server with Internet connection and access from the host machine and other client
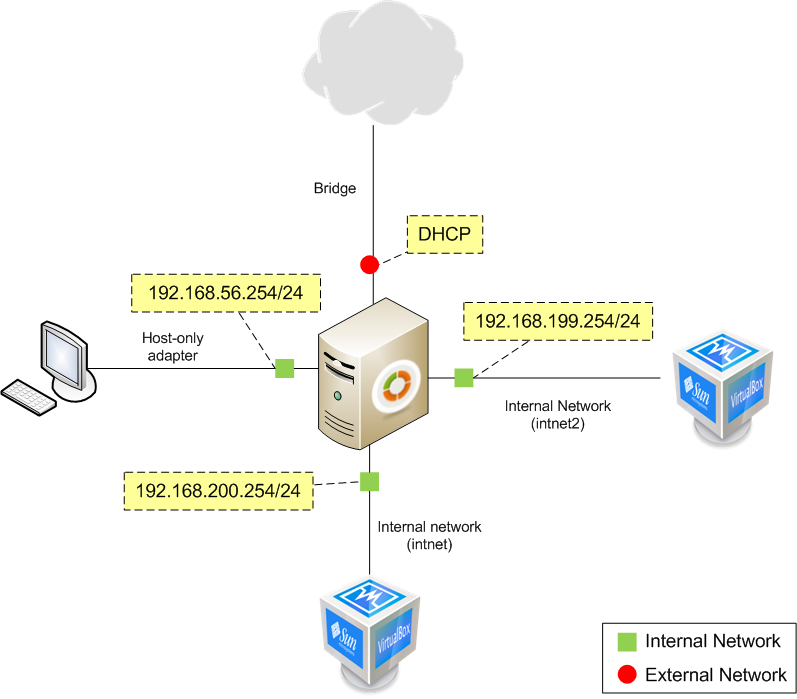
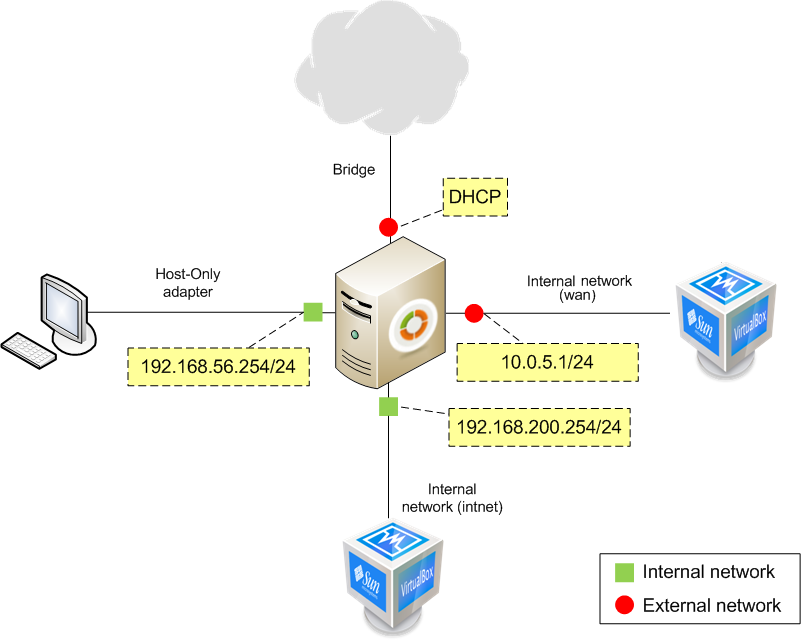
This first scenario consists of a virtualized Zentyal server with three networks. One is a Host interface type connecting with the host server. This network will work on the vboxnet0 interface (Default). A second network will connect the server with a virtual client, using an Internal network type connection. The third connection will link the server to the Internet, using a Bridged Adaptor connection with DHCP resolution.
The first network will use the vboxnet0 interface, using the 192.168.56.0/24 range. This network is considered internal and Zentyal will use it to connect with the Host. The second network will use the intnet interface using the 192.168.200.0/24 range and it will be considered internal, accessing internal services. The third network will connect the server to the Internet and the address will be assigned by DHCP. You must check that these ranges do not clash with any other networks you are connected to. If that is the case, change the example ranges to different ones. You can check the scenario in the following figure:
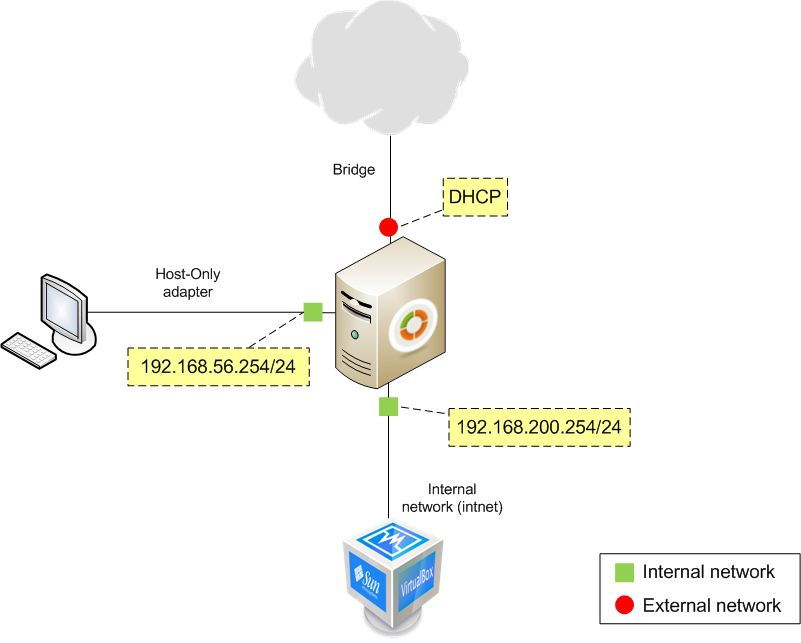
Scenario 1 diagram
The first step is to create the vboxnet network interface on the host using a Host interface type.
Note: In modern versions of VirtualBox, the interface vboxnet is created by default on the host, so we only need to configure the virtualized machine to use one of the interfaces in mode host-only and connect this interface to vboxnet. If this is true for your version, you can skip directly to the step corresponding to figure ‘VirtualBox Settings Network 1’.
You also need to set up the virtual network. In VirtualBox menu select :menuselection: File –> Preferences, with a window similar to the following figure:
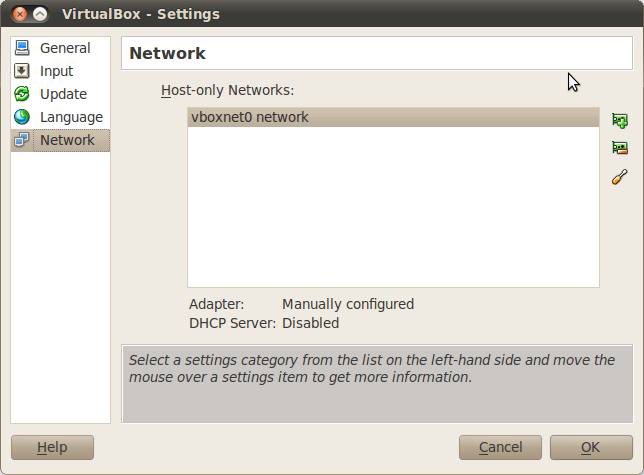
Preferences
To add new networks, click on the Add host-only network button.
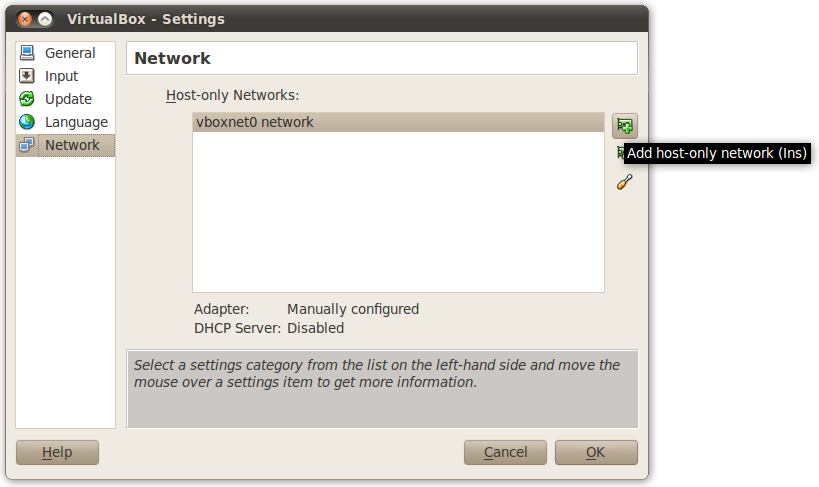
Add host-only network
Once you have created the network, just assign a network address within its IP range. To configure the network, click on the Edit host-only network button.
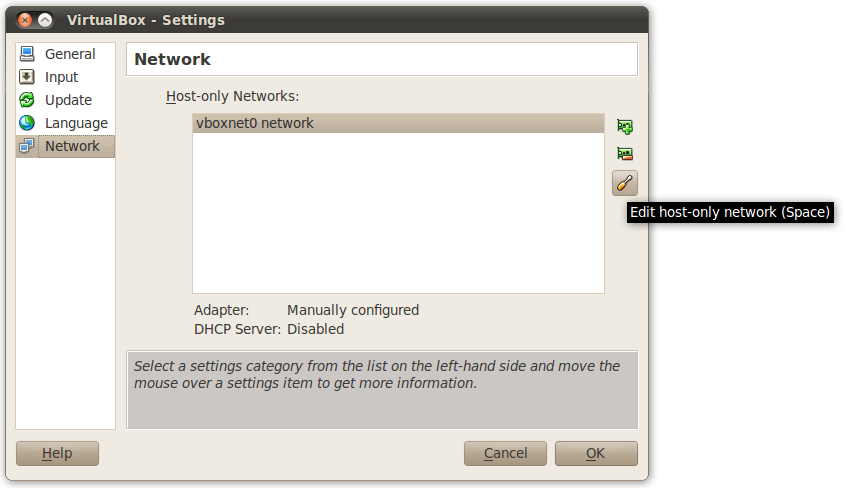
Edit host-only network
You will see a window similar to the following:
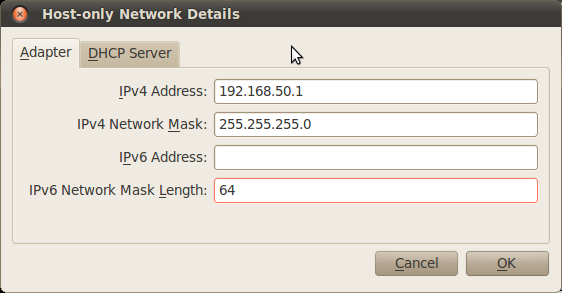
Configuration of a host-only network
In this window you can set the host machine’s IP and its netmask. If required, you can set up a DHCP server for the host-only network, but in this case this is not necessary.
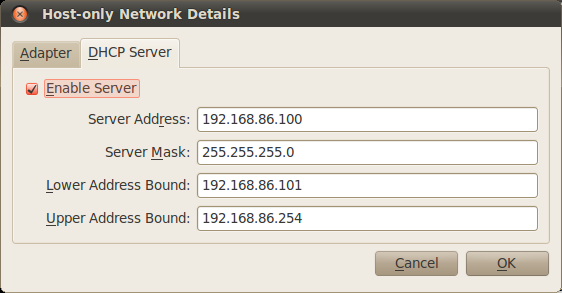
DHCP server configuration in a host-only network
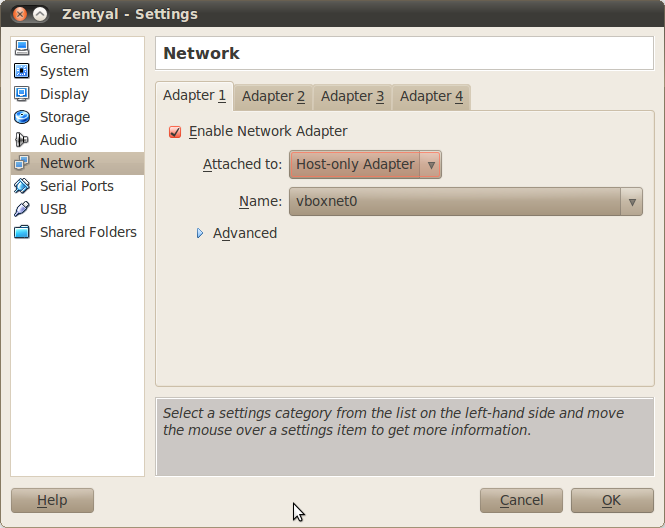
From Settings –> Network on the virtual machine on which you intend to install Zentyal, connect the interfaces to vboxnet0.
VirtualBox Settings Network 1
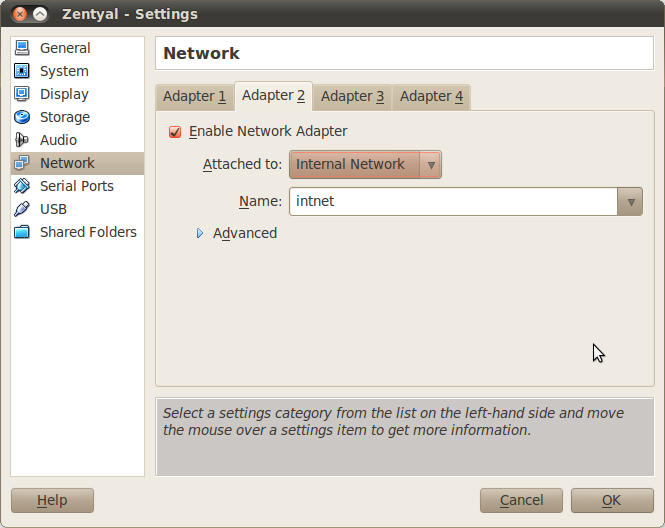
Set the second interface as internal network, as intnet.
VirtualBox Settings Network 2
Set the third interface as Bridged Adapter, choosing the interface you are effectively using to access the Internet from the Host machine. Now you can reboot your Zentyal server and configure its interfaces.
It is recommended you allocate a minimal amount of resources for client machines, particularly RAM memory. This is why, although you can use any operating system for the client machine, we recommend using a specific Linux distribution called grml [1], which is a Debian based Live CD designed for system administrators. 92 MB of memory should be enough and the network will automatically configure when booting.
| [1] | grml <http://grml.org/> |
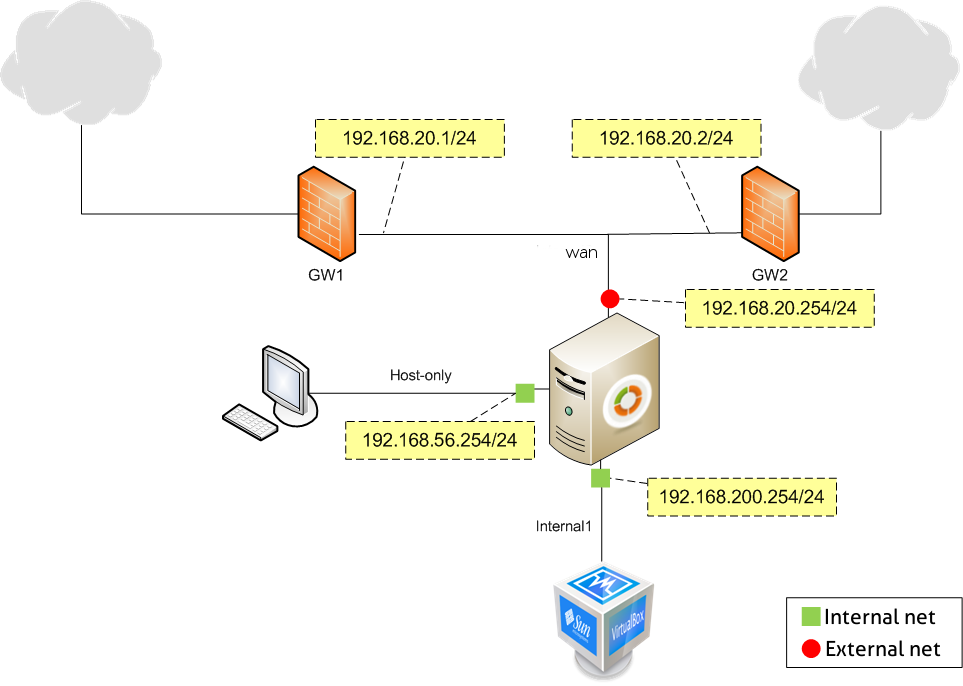
Scenario 2: Virtualized Zentyal server with access from the host and another client with Internet connection through two gateways
The following scenario has the first two interfaces configured in exactly the same way as the previous scenario, but now the third interface is connected to an external network through two gateways which manage traffic to Internet.
Scenario 2 diagram
In order to configure this, you need to use an internal network connection type. As it has to be a different network, you can name it as wan with an IP range 192.168.20.0/24. You need to shutdown the machine before adding this new interface. Similarly, as before, go to Settings ‣ Network, in the tab for the third adaptor select Internal network and set the name to wan.
VirtualBox Settings Network 3
You should connect the two machines acting as gateways to the same internal network.
Scenario 3: Virtualized Zentyal server with Internet connection and access from the host and two clients
This scenario is similar to the first one, but you add another virtual network with the range 192.168.199.0/24.
Scenario 3 diagram
This interface is internal and you can create it in a similar way as in the previous scenario, but linked to a fourth interface.

VirtualBox Settings Network 4
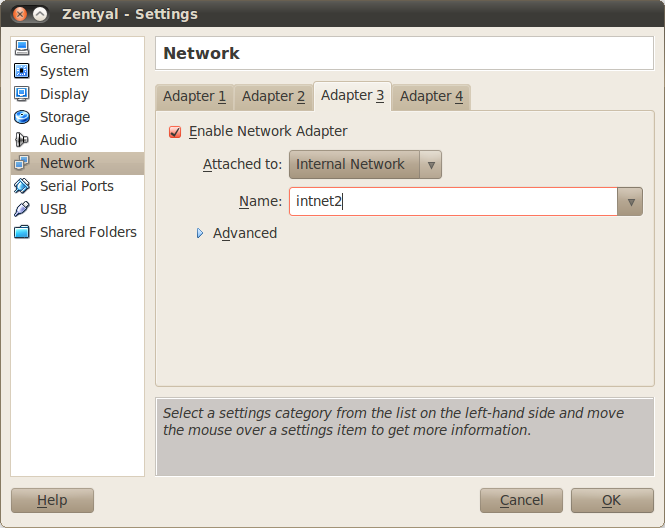
Scenario 4: Virtualized Zentyal server connected to another virtualized Zentyal linking two separate networks
In order to build this scenario, you need to duplicate the first then connect them through an internal network connection, intnet3. Take into account the diagram; you need to create an internal network intnet2 with IP range 192.168.199.0/24, as you cannot use intnet1 to connect that client. Moreover, for the second connection of the host you will need to assign another IP address.
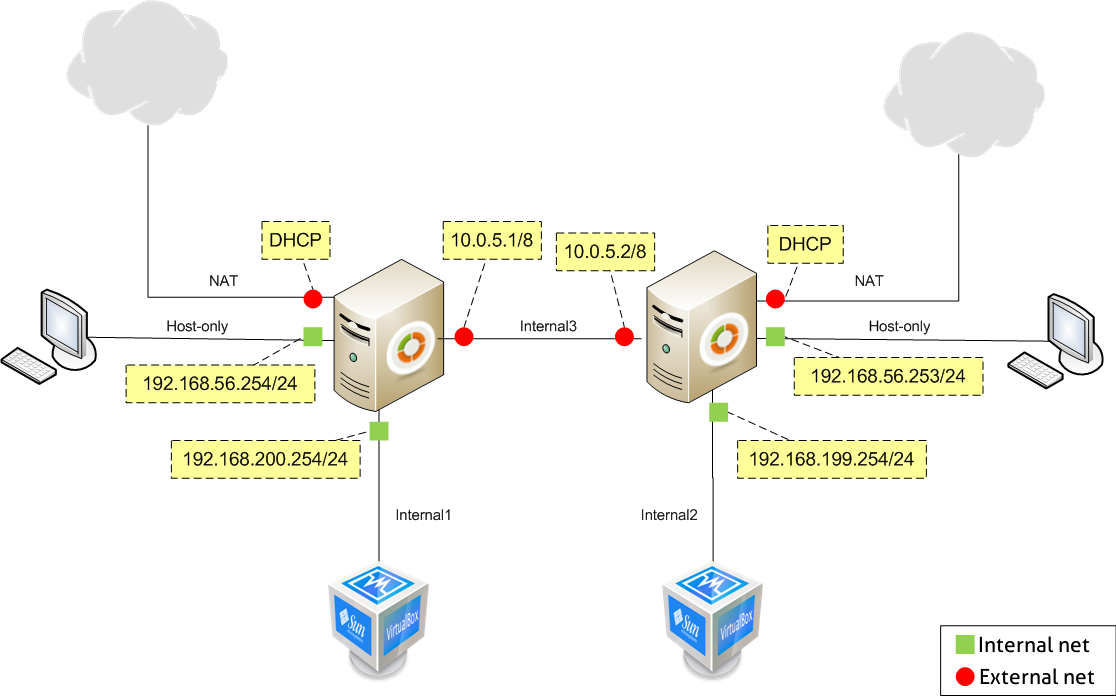
Scenario 4 diagram
Set the fourth interface of each server so it belongs to that network.
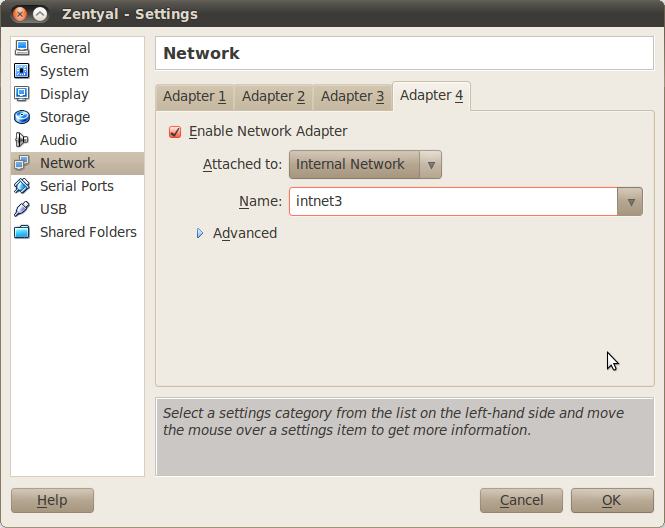
VirtualBox Settings Network 5
Scenario 5: Virtualized Zentyal server with Internet access, access from the host machine, clients in Internal and External networks
This scenario is similar to the first one, but you will add a fourth network interface. In VirtualBox, you will configure it as an ‘Internal Network’, named ‘wan’. In Zentyal, you will configure this new interface as ‘External network’ and then, you will configure it manually with IP and netmask 10.0.5.1/24.
You will add a new virtualized client as well, this client will have a single interface, that you have to configure manually with IP and netmask 10.0.5.2/24. This way, both the Zentyal and the client should be in the same external network.
Note: Zentyal’s firewall blocks ping requests (ICMP service) from external networks by default.
Scenario 5 diagram